Working with Table Nodes
Table nodes are the core unit of an ERD. A node handles the table name, column list, status display, column editing, and table actions.
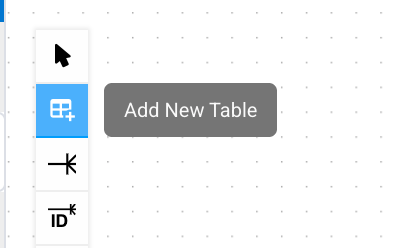
Add Tables
Add a table by clicking the canvas in new table mode, dragging a table from the left DB tree onto the canvas, or using Add to current ERD from the table context menu.
| Method | Description |
|---|---|
| New table mode | Design a table in the ERD before it exists in the database. |
| Drag and drop | Add an existing database table at the current canvas position. |
| Context menu | Add the selected table from the tree or table menu to the current ERD. |
| DDL Import | Parse DDL statements and bring table definitions into the ERD. |
Tables from another Connection or Database cannot be added. In a specific-Schema ERD, only tables from the same Schema can be added.
Edit Table Names and Columns
When you select a table, you can edit the table name directly in the header and update column properties in the column grid inside the node. Changes become targets for save, restore, or apply-to-DB actions.
| Field | Description |
|---|---|
| Column | The column name. Renames are tracked as rename candidates for existing columns. |
| Data Type | Use the selected DBMS type list or enter a type manually. |
| PK | Whether the column is a Primary Key. PK columns also behave as NOT NULL. |
| N/N | A column that does not allow NULL. |
| A/I | An auto-increment column. The actual DDL expression differs by DBMS. |
| Default Value | Choose Value, Expression, or Not Set. Value is handled as a literal, while Expression is handled as a SQL expression such as a function or sequence. |
| Remarks | The column description. If the DBMS supports it, this is applied as comment DDL. |
Column Grid Controls
The column grid supports both keyboard and mouse controls. Select column rows to copy, cut, paste, or delete them, and drag rows to reorder them.
| Control | Description |
|---|---|
| Add column | Add a new column from the grid or continue entering the next column with a shortcut. |
| Delete column | Marks the selected column for deletion. Existing database columns are not actually deleted until changes are applied to the DB. |
| Copy / paste columns | Copy selected column definitions to another table in the same Schema scope. |
| Reorder | Drag column rows to adjust their order. Reordering all existing columns is supported in MySQL/MariaDB; in other DBMSs, it is available only for new tables or newly added columns. |
Generated and Virtual Columns
After selecting a column, you can mark or unmark it as a generated column from the right-click menu. In DBMSs with multiple supported modes, choose VIRTUAL or STORED, and enter the generation expression in the column's Default Value cell.
| Item | Action |
|---|---|
| Display | Generated columns are distinguished by a calculation icon before the column name and a purple generation expression. |
| Expression | Enter the SQL expression that calculates the column value in the Default Value cell. |
| Mutual exclusion | When a column is marked as generated, regular default value and auto-increment settings are cleared. |
| DBMS-specific mode | Oracle uses VIRTUAL, PostgreSQL and H2 use STORED, and other DBMSs show choices depending on supported features. |
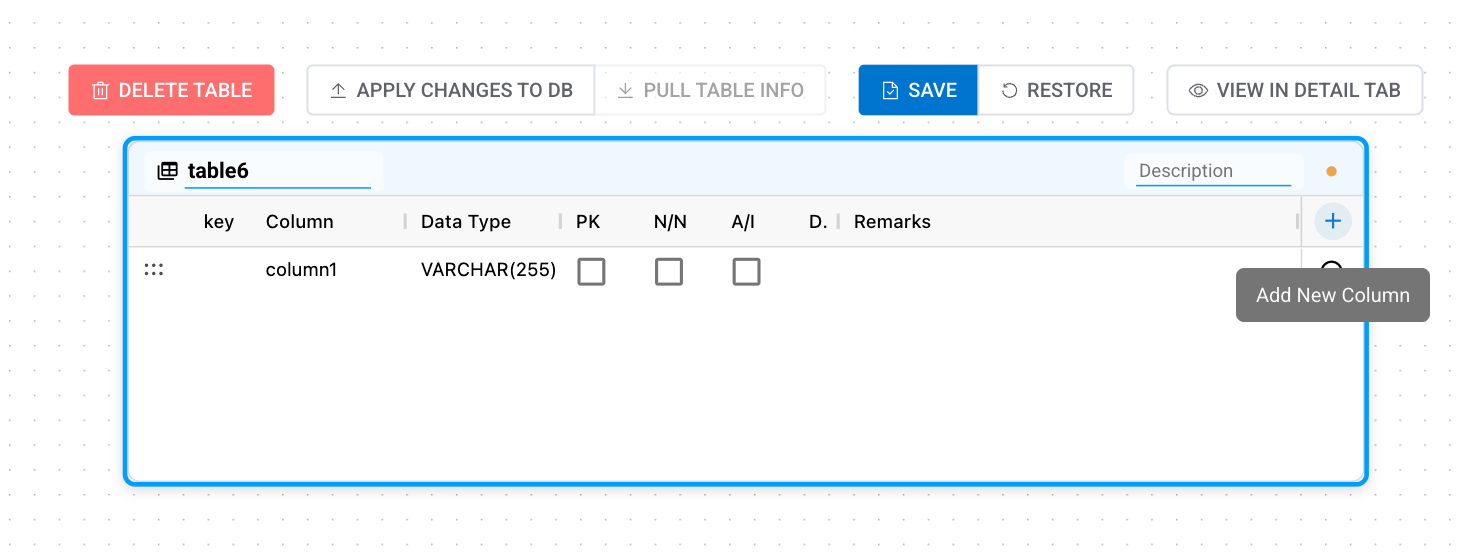
Selected Table Actions
When you select a table, a toolbar appears at the top of the node. Similar actions are also available from the context menu.
| Action | Behavior |
|---|---|
| Delete Table | Marks the table for deletion. Confirm whether it will actually be deleted from the DB in the preview before applying. |
| Apply Changes to DB | Previews DDL and applies only this table's changes to the DB. |
| Pull Table Info | Reads the current table information again from the DB. |
| Save | Saves the current ERD and table changes. |
| Restore | Reverts changes made before saving. |
| View in Detail Tab | Opens the bottom detail panel so you can edit FKs, indexes, and constraints in a wider view. |
Table Status Display
Table nodes show not only structure, but also Schema and current status. In all-Schema ERDs, a Schema tab is shown above each node by default, and you can toggle it from the right info panel.
| Display | Meaning |
|---|---|
| Schema | The Schema the table belongs to. It helps distinguish same-name tables when viewing tables from multiple Schemas together. |
| RLS | A PostgreSQL/Supabase table with Row-Level Security enabled. |
| Publication | A PostgreSQL/Supabase table included in a Publication. |
| System Schema | A table in a system Schema, where structural changes are restricted. |
| Deleted | A table marked for deletion in the ERD. Confirm whether it will actually be deleted in the preview before applying to the DB. |
Compact Display
When you enable the Compact LOD option in the right info panel, tables appear as lightweight nodes centered on the table name at reduced zoom levels. This display mode improves performance and readability when viewing the overall structure of a large ERD.