
Installation & Launch
NeoSQL ships as a web app and as desktop apps for Windows and macOS. Pick the execution mode that fits your environment and follow the install / startup steps.
Which Setup Fits You
NeoSQL ships as a desktop app and a web app, and the desktop app works without signing in. Pick the combination that matches your environment.
Desktop (Signed Out) — Install and Go, Data Stays on Your PC
Install the desktop app and start working immediately — no sign-up, no login. Projects are created as local projects stored only on this PC and are never sent to a server. Internal-network and local DB connections, the ERD canvas, SQL Editor, and code generation all work as usual; only account-backed features such as team collaboration, sharing, and cloud backup are unavailable.
Desktop (Signed In) — Internal DB Access Plus Team Collaboration
Sign in when you need to reach internal-network or local databases behind a firewall or VPN and collaborate with a team at the same time. The desktop app connects to databases directly from your PC, so any database your PC can reach also works in NeoSQL, and account projects sync to the cloud so teammates stay in lockstep. You can keep using local projects alongside them.
Web — Fastest Way to Start, No Install
The quickest entry point: use NeoSQL directly in your browser with no install. After OAuth social login you can use the ERD canvas and SQL Editor immediately, and cloud sync enables real-time collaboration with teammates. The trade-offs: you cannot reach internal-network or local DBs (only public databases reachable from the internet), and the web app always requires sign-in.
Using the Web App
How to start NeoSQL in a browser without installing anything.
Getting Started
Open the NeoSQL official site, sign in on the login page, and you'll land on the dashboard. Your active projects are listed; click "New Project" to create one or pick an existing project to continue. For full walkthroughs of sign-up, login, and project management, see the guides below.
Desktop App Install & Start
The macOS and Windows desktop apps connect directly to internal-network and local databases. You can start using them right after install without signing in, and sign in whenever you need account projects for team collaboration.
macOS Install
How to install the NeoSQL desktop app on a Mac. Both Apple Silicon and Intel-based Macs are supported, each with its own installer.
Download the DMG
Download the installer that matches your Mac's chip from the NeoSQL official site. Use NeoSQL-mac-arm64.dmg on Apple Silicon Macs and NeoSQL-mac-x64.dmg on Intel-based Macs. To check which chip you have, open Apple menu > About This Mac.
Install the App
Open the DMG and drag the NeoSQL icon into the Applications folder.
Approve Gatekeeper
On first launch you may see an "unidentified developer" warning. Open System Settings → Privacy & Security and click "Open Anyway" next to NeoSQL. The warning won't appear again on subsequent launches.
Windows Install
How to install the NeoSQL desktop app on Windows. Microsoft SmartScreen may show a prompt at the download stage and again at the execution stage, so follow the steps below in order.
Download the Installer
Download NeoSQL-win-x64-Setup.exe from the NeoSQL official site.
Bypass Download SmartScreen (Microsoft Edge)
Microsoft SmartScreen may temporarily block newly-published, unsigned files at the download stage. When a block notice appears, follow the flow shown in the image below to retain the file. (Microsoft Edge enforces SmartScreen more strictly than other browsers.)
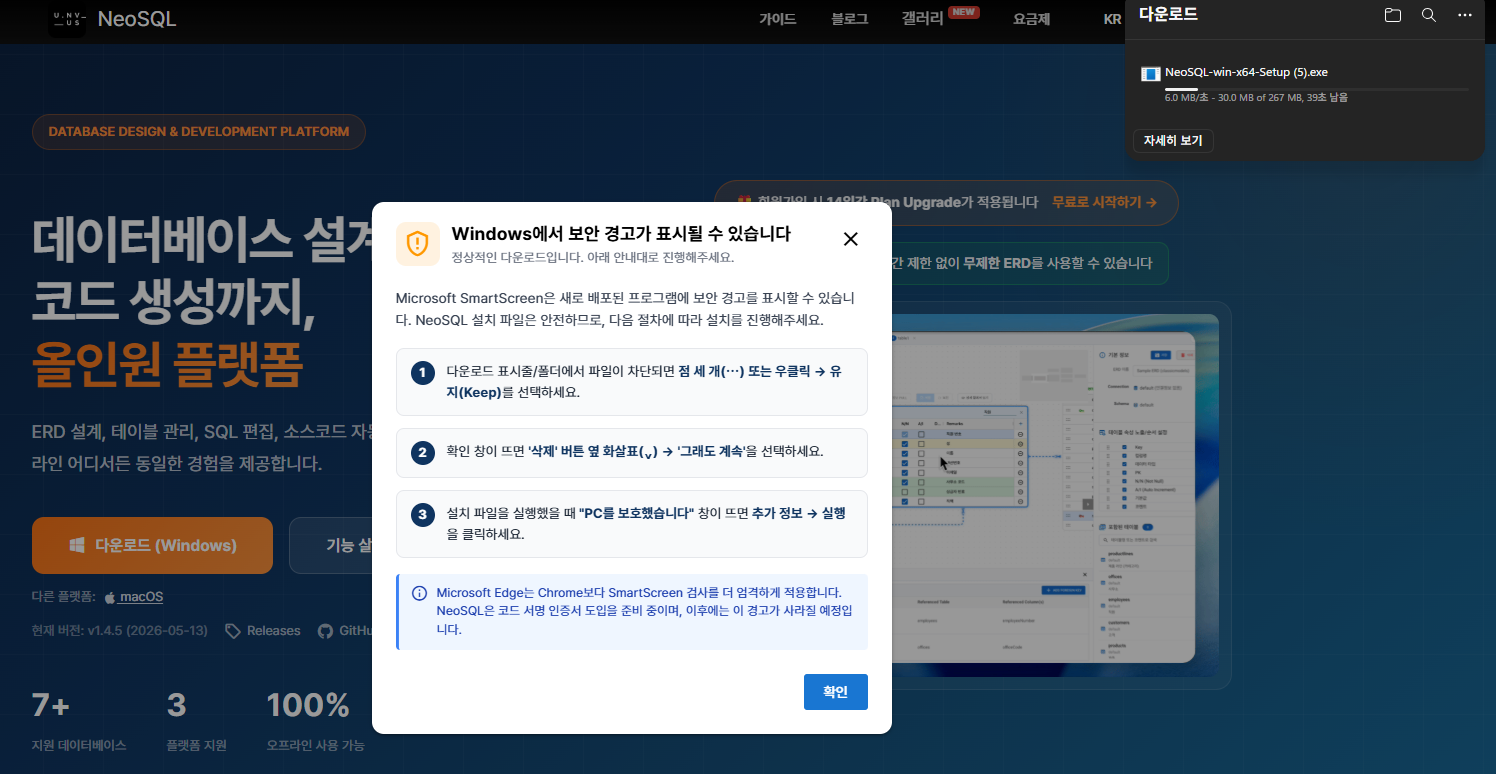
Bypass Execution SmartScreen (Windows)
Run the downloaded installer. When Windows SmartScreen shows the "Windows protected your PC" dialog, click "More info" → "Run anyway" to continue.
Finish Install & Allow Firewall
Follow the installer wizard; shortcuts will be created on your desktop and Start menu. No environment variables or separate Java install is required, and the neosql:// deep-link handler is registered automatically. On first launch, if Windows Firewall prompts about network access, choose "Allow access" so NeoSQL can reach your databases.
If installation is blocked in a corporate environment, ask IT to allowlist the NeoSQL installer. NeoSQL is preparing code-signing certification, after which these SmartScreen warnings will disappear.
Where Credentials Are Stored
The desktop app encrypts DB passwords and SSH keys in the OS-native secret store.
- macOS — Credentials are encrypted and stored in the macOS Keychain, scoped to the user account.
- Windows — Credentials are encrypted and stored in the Windows credential vault (DPAPI), scoped to the current user account.
Auto-Update
The desktop app checks for updates on launch and downloads them in the background. Once the download finishes, you'll see a prompt with "Restart Now" and "Later" options — choose "Later" to apply the update automatically the next time you quit the app. Auto-update does not run in air-gapped environments; IT must distribute new installer builds manually.
Getting Started
From the installed desktop app, click "Sign in via browser" — the default browser opens the NeoSQL login page, and once you authenticate, the neosql:// deep-link handler returns you to the desktop app automatically. From the dashboard you can create a new project or pick an existing one to start working. For full walkthroughs of sign-up, login, and project management, see the guides below.
Feature Differences by Mode
Compare available features across each environment at a glance. Desktop is one and the same app — signing in only changes which account-backed features are available.
| Feature | Desktop | Web | |
|---|---|---|---|
| Signed Out | Signed In | ||
| Core | |||
| ERD Design / Edit | Yes | Yes | Yes |
| SQL Editor | Yes | Yes | Yes |
| Code Generation NEW | Yes | Yes | Yes |
| Forward / Reverse Engineering | Yes | Yes | Yes |
| Database | |||
| Public DB | Yes | Yes | Yes |
| Private / Local DB | Yes | Yes | No |
| Collaboration | |||
| Team Collaboration (Real-time Sync) | No | Yes | Yes |
| Project Sharing / Invite | No | Yes | Yes |
| Cloud Backup | No | Yes | Yes |
| Extra | |||
| AI Features | Partial with your own API key | Yes | Yes |
| Template Store (Download / Upload) | Partial public packs, download only | Yes | Yes |
Choose the desktop app when you need to reach internal-network, local, or VPN/firewalled databases. It works without signing in, and you can sign in later to add account projects once you need team collaboration, sharing, or cloud backup.
Project Type Policy
Every project is created as either a local project or an account project, and the storage layer differs — the type cannot be changed later. Choose deliberately when you create it.
Local ↔ Account Projects: No Direct Switch
Local projects live only on this PC, while account projects are stored in the cloud and sync with your teammates. Because the storage layer itself differs, there is no automatic migration tool: to change type, create a new project of the desired type and re-import ERDs and table definitions. While signed in you can use both types side by side, so adding a new project is usually enough — no switch required.