Execution Modes
NeoSQL can be used in three modes: Online (Web), Online (Desktop), and Offline. Choose the mode that fits your environment.
Mode Overview
Online (Web)
Use directly in your browser. Cloud sync enables team collaboration after OAuth login. Only public DBs can be connected.
Online (Desktop)
Desktop app + cloud sync. Connect to internal network DBs, local DBs, and databases behind VPNs, and collaborate with your team.
Offline
Use on desktop without internet. Connect directly to internal network DBs, local DBs, and databases behind VPNs. Ideal for air-gapped environments. Authenticate with a license key.
Feature Comparison
Compare available features across modes at a glance.
| Feature | Online (Web) | Online (Desktop) | Offline |
|---|---|---|---|
| Core Features | |||
| ERD Design / Edit | Yes | Yes | Yes |
| SQL Editor | Yes | Yes | Yes |
| Code Generation NEW | Yes | Yes | Yes |
| Forward / Reverse Engineering | Yes | Yes | Yes |
| DB Connection | |||
| Public DB Connection | Yes | Yes | No |
| Internal / Local DB Connection | No | Yes | Yes |
| Collaboration & Cloud | |||
| Team Collaboration (Real-time Sync) | Yes | Yes | No |
| Project Sharing / Invite | Yes | Yes | No |
| Cloud Backup | Yes | Yes | No |
| Additional Features | |||
| AI Features | Yes | Yes | No |
| Template Store (Download/Upload) | Yes | Yes | No |
Use the desktop app if you need to connect to internal network DBs, local DBs, or databases behind VPNs or firewalls.
Note: Projects created in offline mode cannot be converted to online mode later. Choose the appropriate mode from the start.
Start Online Mode
Online mode uses OAuth social login for authentication. Available in both web browser and desktop app.
Launch App
Access the NeoSQL web app or launch the desktop app.
Social Login
Log in with Google, GitHub, or other social accounts on the login screen. On desktop, authentication happens in the browser and auto-connects to the app.
Select Project
After authentication, you'll be navigated to the dashboard. Your project list is displayed, and you can create a new project or select an existing one.
Team Invite & Management (Online Only)
Invite team members and manage roles in online mode.
Invite Team Members
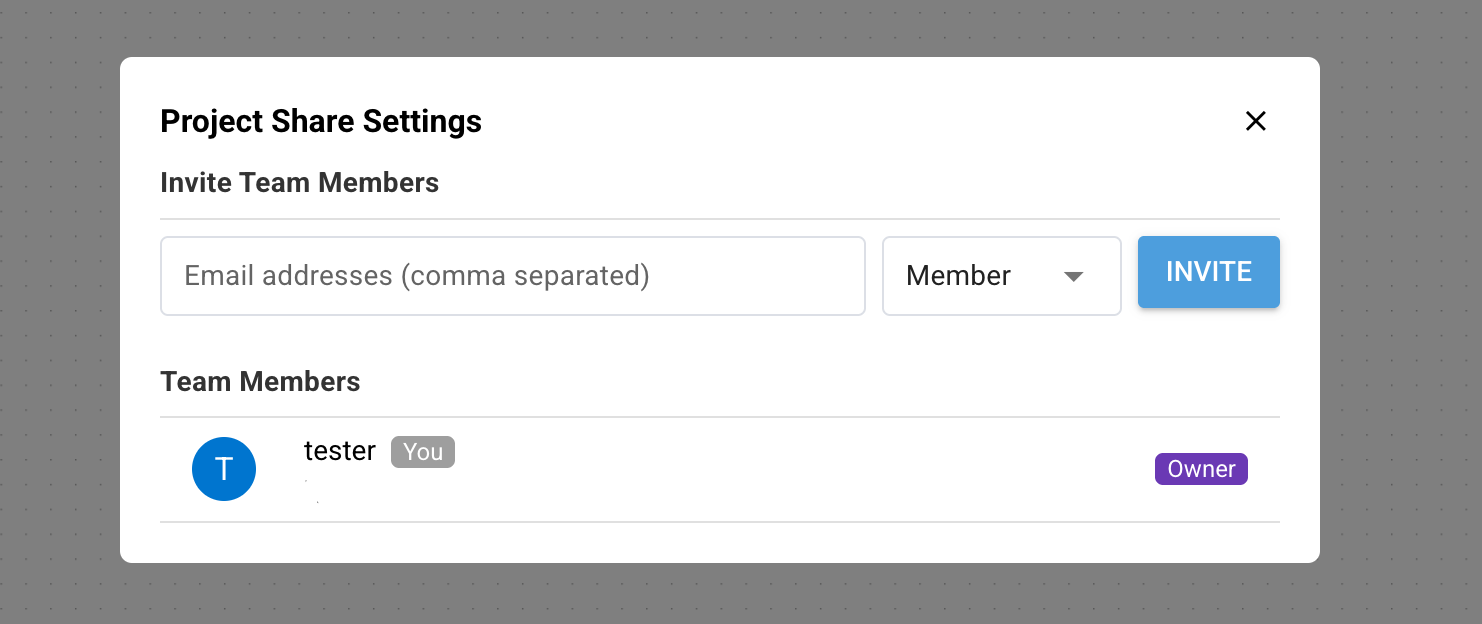
Open Share Settings
Click the share button in the project editor toolbar to open project share settings.
Enter Email
Enter the email of the team member to invite. Separate multiple emails with commas (,).
Select Role & Send Invite
Select a role and send the invitation. An email will be sent to the invited user.
Accept Invitation
When the team member clicks the invite link in the email, they join the project automatically after login.
Roles & Permissions
Four roles can be assigned to project members.
| Role | Invite Members | Change Role | Remove Member | Transfer Ownership |
|---|---|---|---|---|
| Owner | Manager, DBA, Member | All members | All members | Yes |
| Manager | DBA, Member | No | DBA, Member | No |
| DBA | No | No | No | No |
| Member | No | No | No | No |
Role-based feature permissions
Beyond member management, each role's actions in the project are controlled by permission flags. The defaults at project creation are:
| Permission | Manager | DBA | Member |
|---|---|---|---|
| Sharing (invite members / edit share settings) | Yes | No | No |
| Connection management (read / add / edit / delete) | Yes | Yes | No |
The owner can also toggle the following per-role options:
- Watermark force — Forces the watermark to remain on when this role prints an ERD; they cannot disable it.
- DDL restrict — Blocks this role from creating, editing, or deleting tables.
- DDL approver — When the DDL approval workflow is enabled, designates which role approves pending DDL statements.
These defaults can be changed at any time by the project owner via the "Project Settings → Role Permissions" tab.
Share modal layout
The project share modal is divided into two areas.
- Members list — Every person who has accepted an invite and currently belongs to the project. Each row shows the name/email and a role badge; users with the right permission can change a member's role or remove them from the right-hand menu.
- Pending invitations — Invites that have been sent but not yet accepted. Visible only to the owner and only when at least one invitation is pending. Clicking the X button on the right of an entry opens a confirmation dialog that includes the invitee's email — for example "Cancel the invitation sent to invitee@example.com?" — and clicking OK cancels the invitation immediately. Once accepted, an invitation automatically moves into the members list; expired or cancelled invitations no longer appear in the modal.
Manage Members
Manage current project members in the Members tab of share settings.
- View each member's role and last access time in the member list.
- Owner or Manager can change member roles or remove them from the project.
- Owner can transfer ownership to another member.
- Non-owner members can leave the project on their own.
Owner or Manager can configure project visibility (Public/Members Only) and copy permissions in the Settings tab.
Generate Offline Key
A license key is required to use offline mode. Users on the Pro plan or above can issue keys directly from the My Page on the web.
Prerequisite You must be subscribed to a plan that includes offline key issuance (Pro or above). The offline key menu is disabled on the Free and Basic plans.
Go to My Page
Log in to the NeoSQL website, then navigate to My Page > Offline Key.
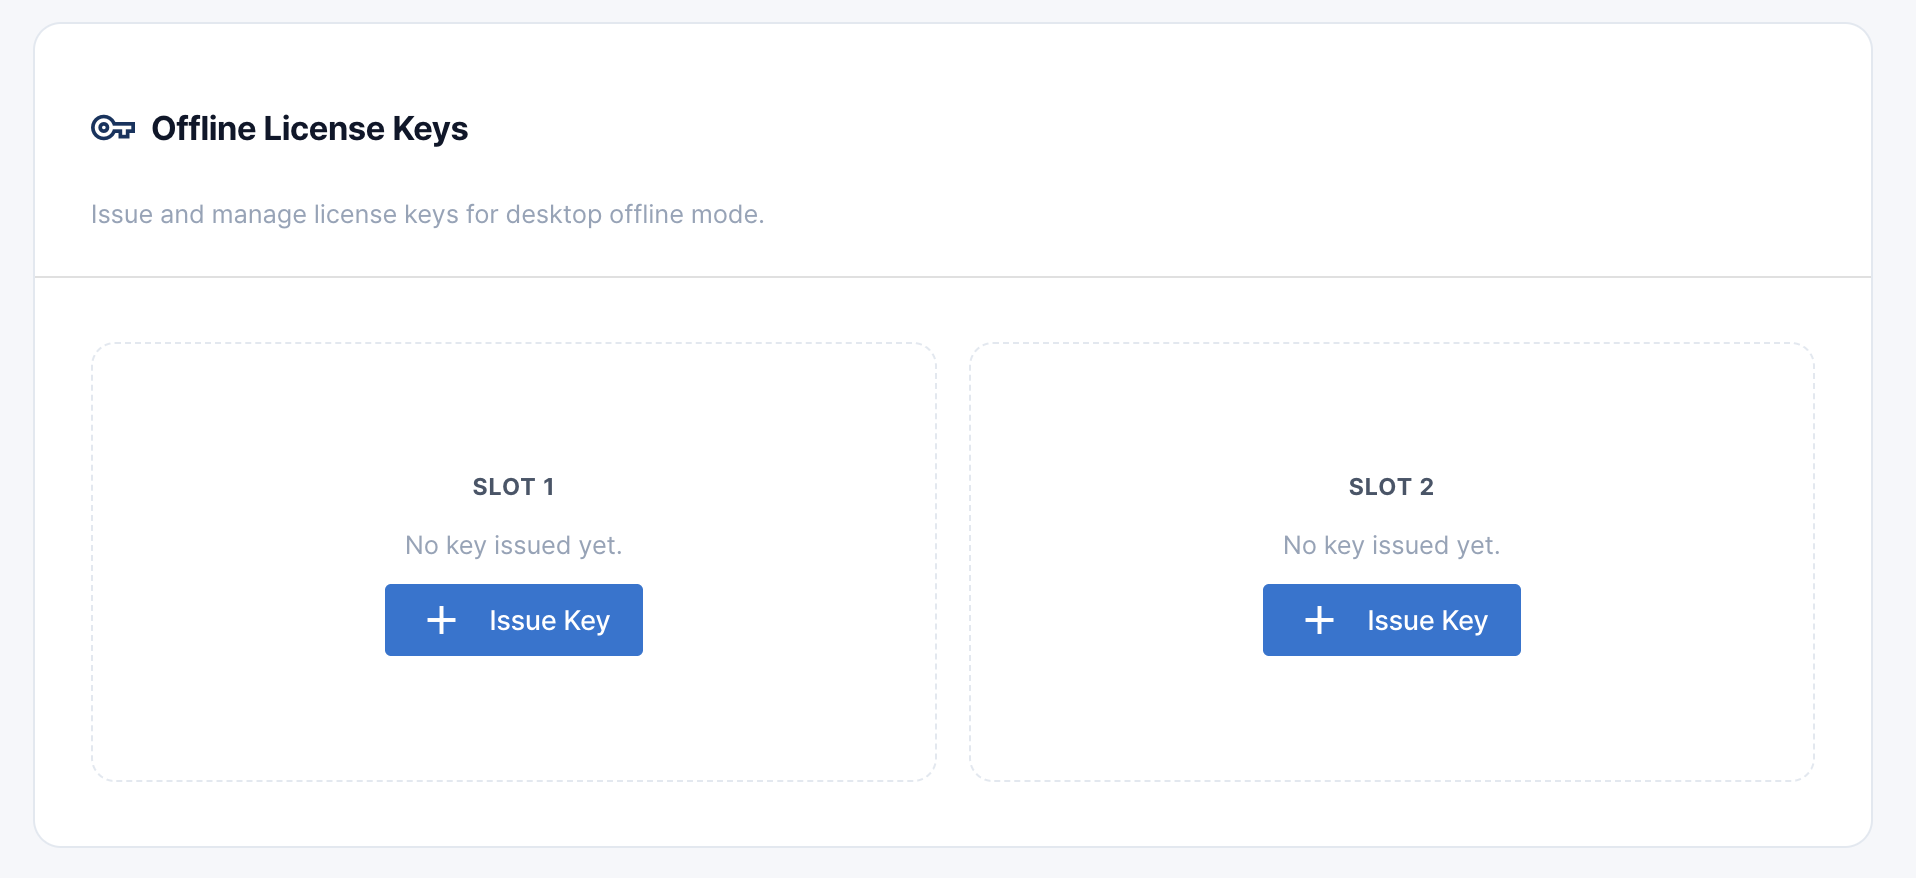
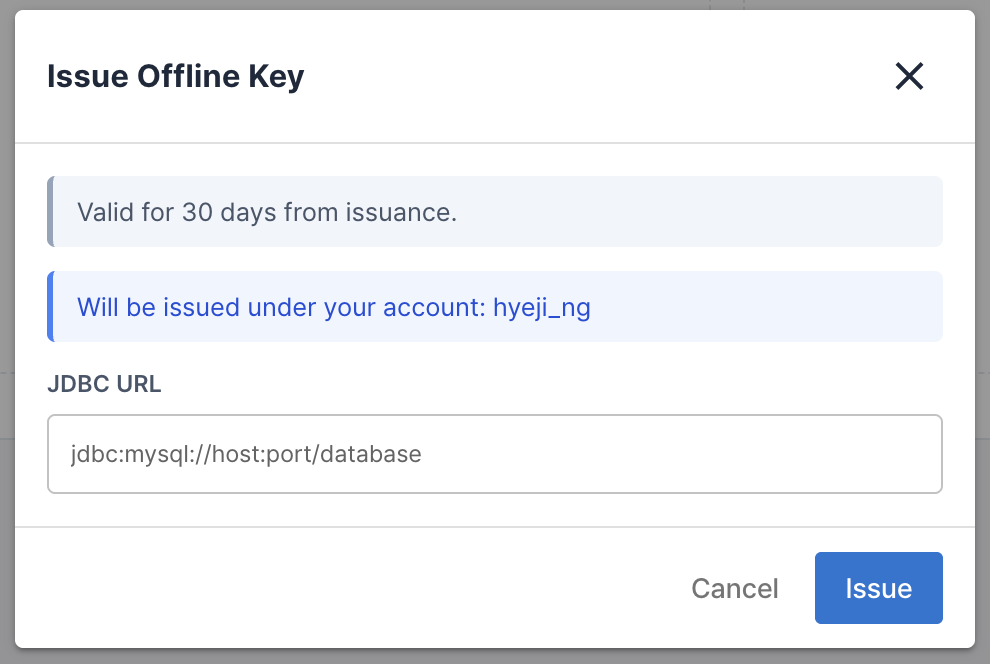
Generate Key
Click the "Issue" button on an empty slot. Enter the JDBC URLs you want to access offline, then complete the issuance.
Download Key File
Click the "Download Key File" button on the issued slot card to download the license key file in JSON format.
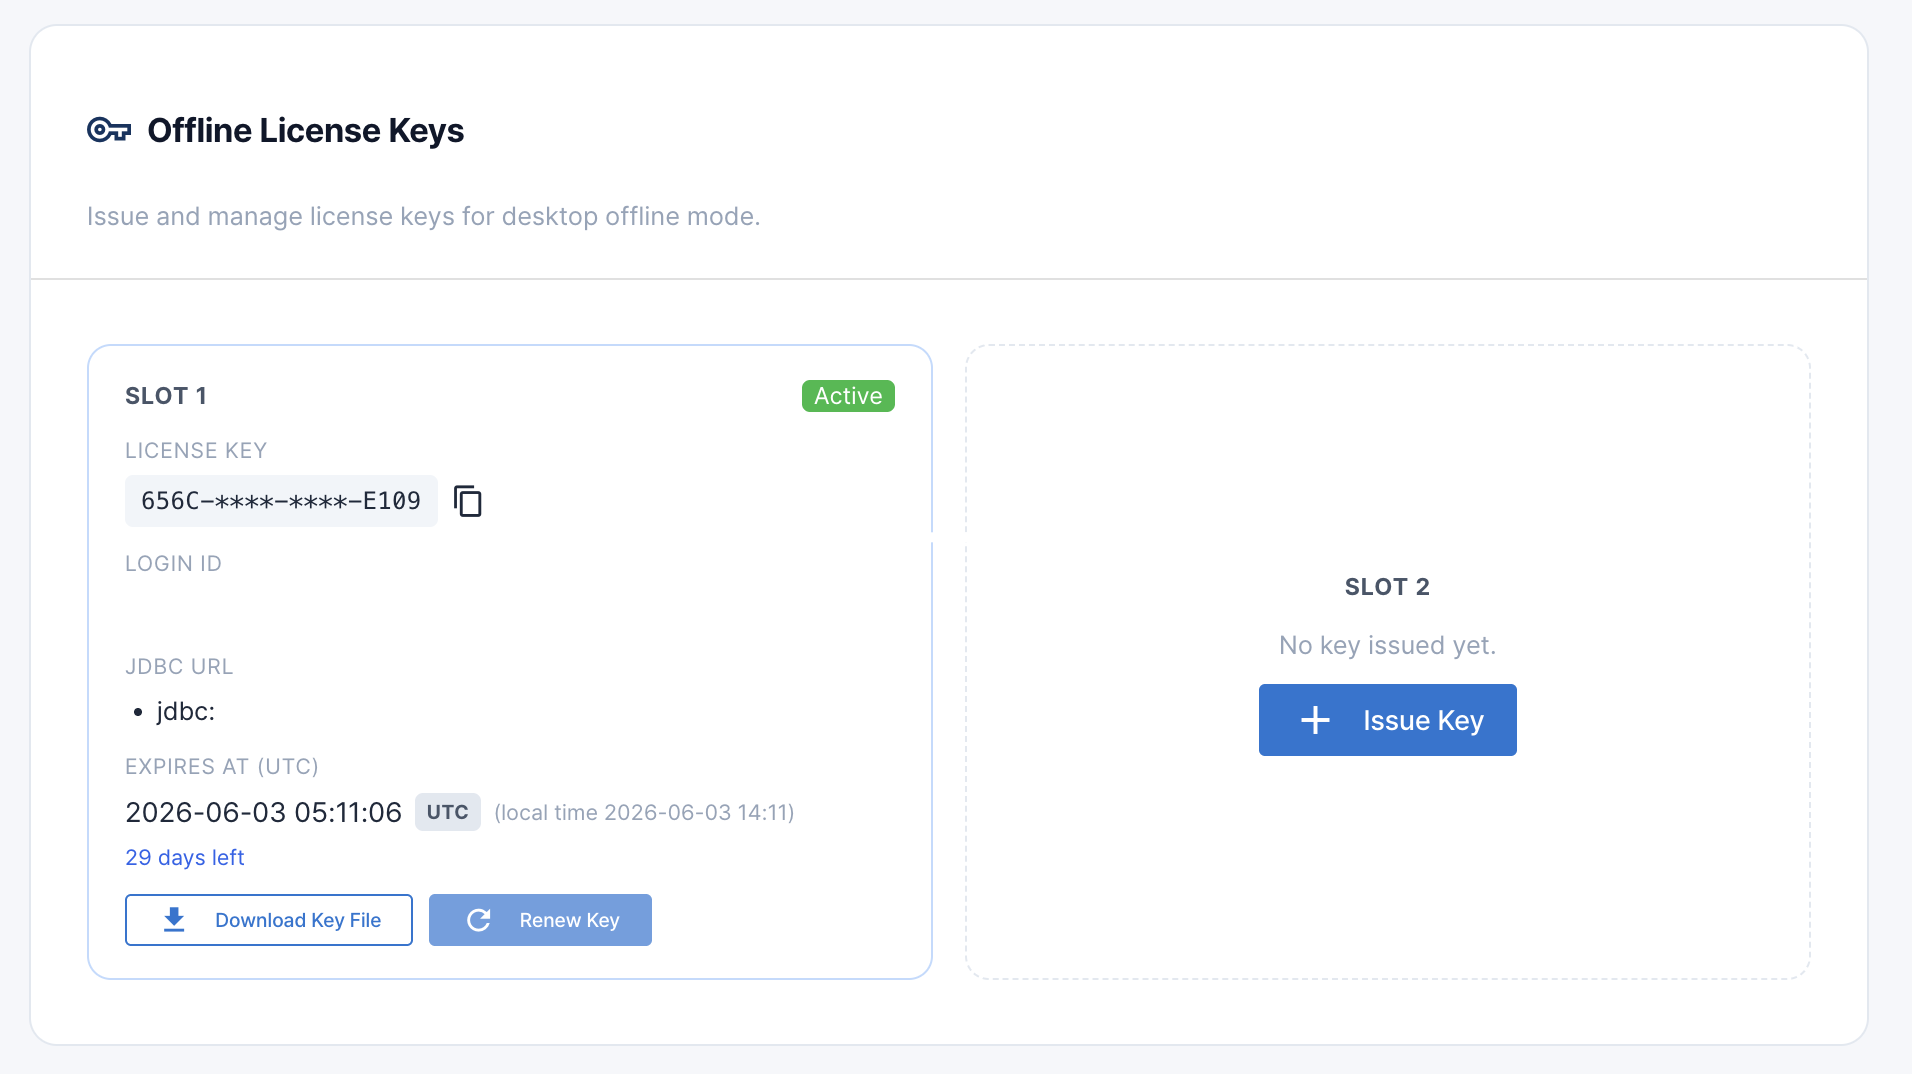
Key Renewal
Issued keys expire after 30 days. Renewal is available starting 3 days before expiration. You can also change the JDBC URLs during renewal. After renewal, you must download the new key file again.
Note: Issued keys cannot be deleted and occupy the slot until expiration. Once downloaded, a key file remains valid until its expiration date.
Start Offline Mode
Start NeoSQL in offline mode from the desktop app.
Launch App
Launch the NeoSQL desktop app.
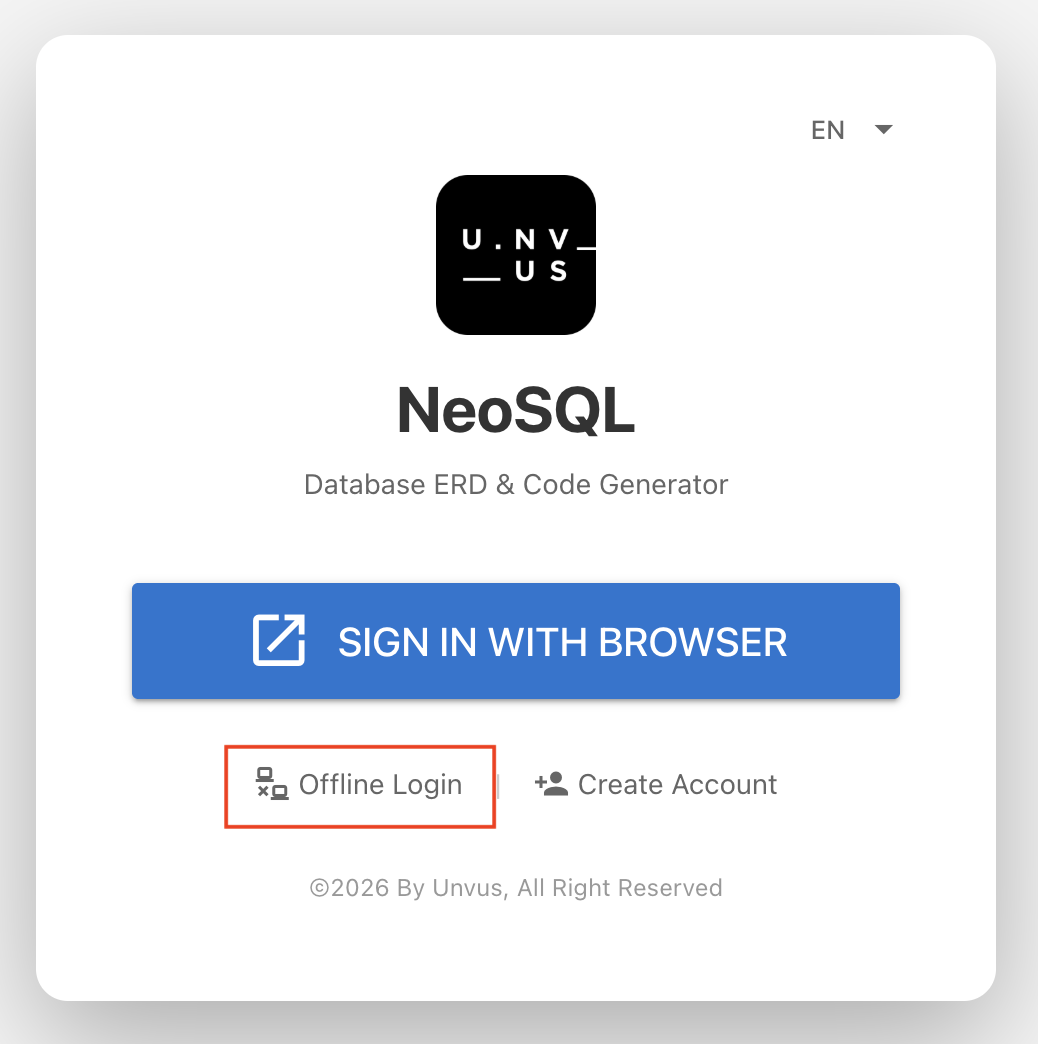
Select Offline Mode
Click the "Start in Offline Mode" link at the bottom of the login screen.
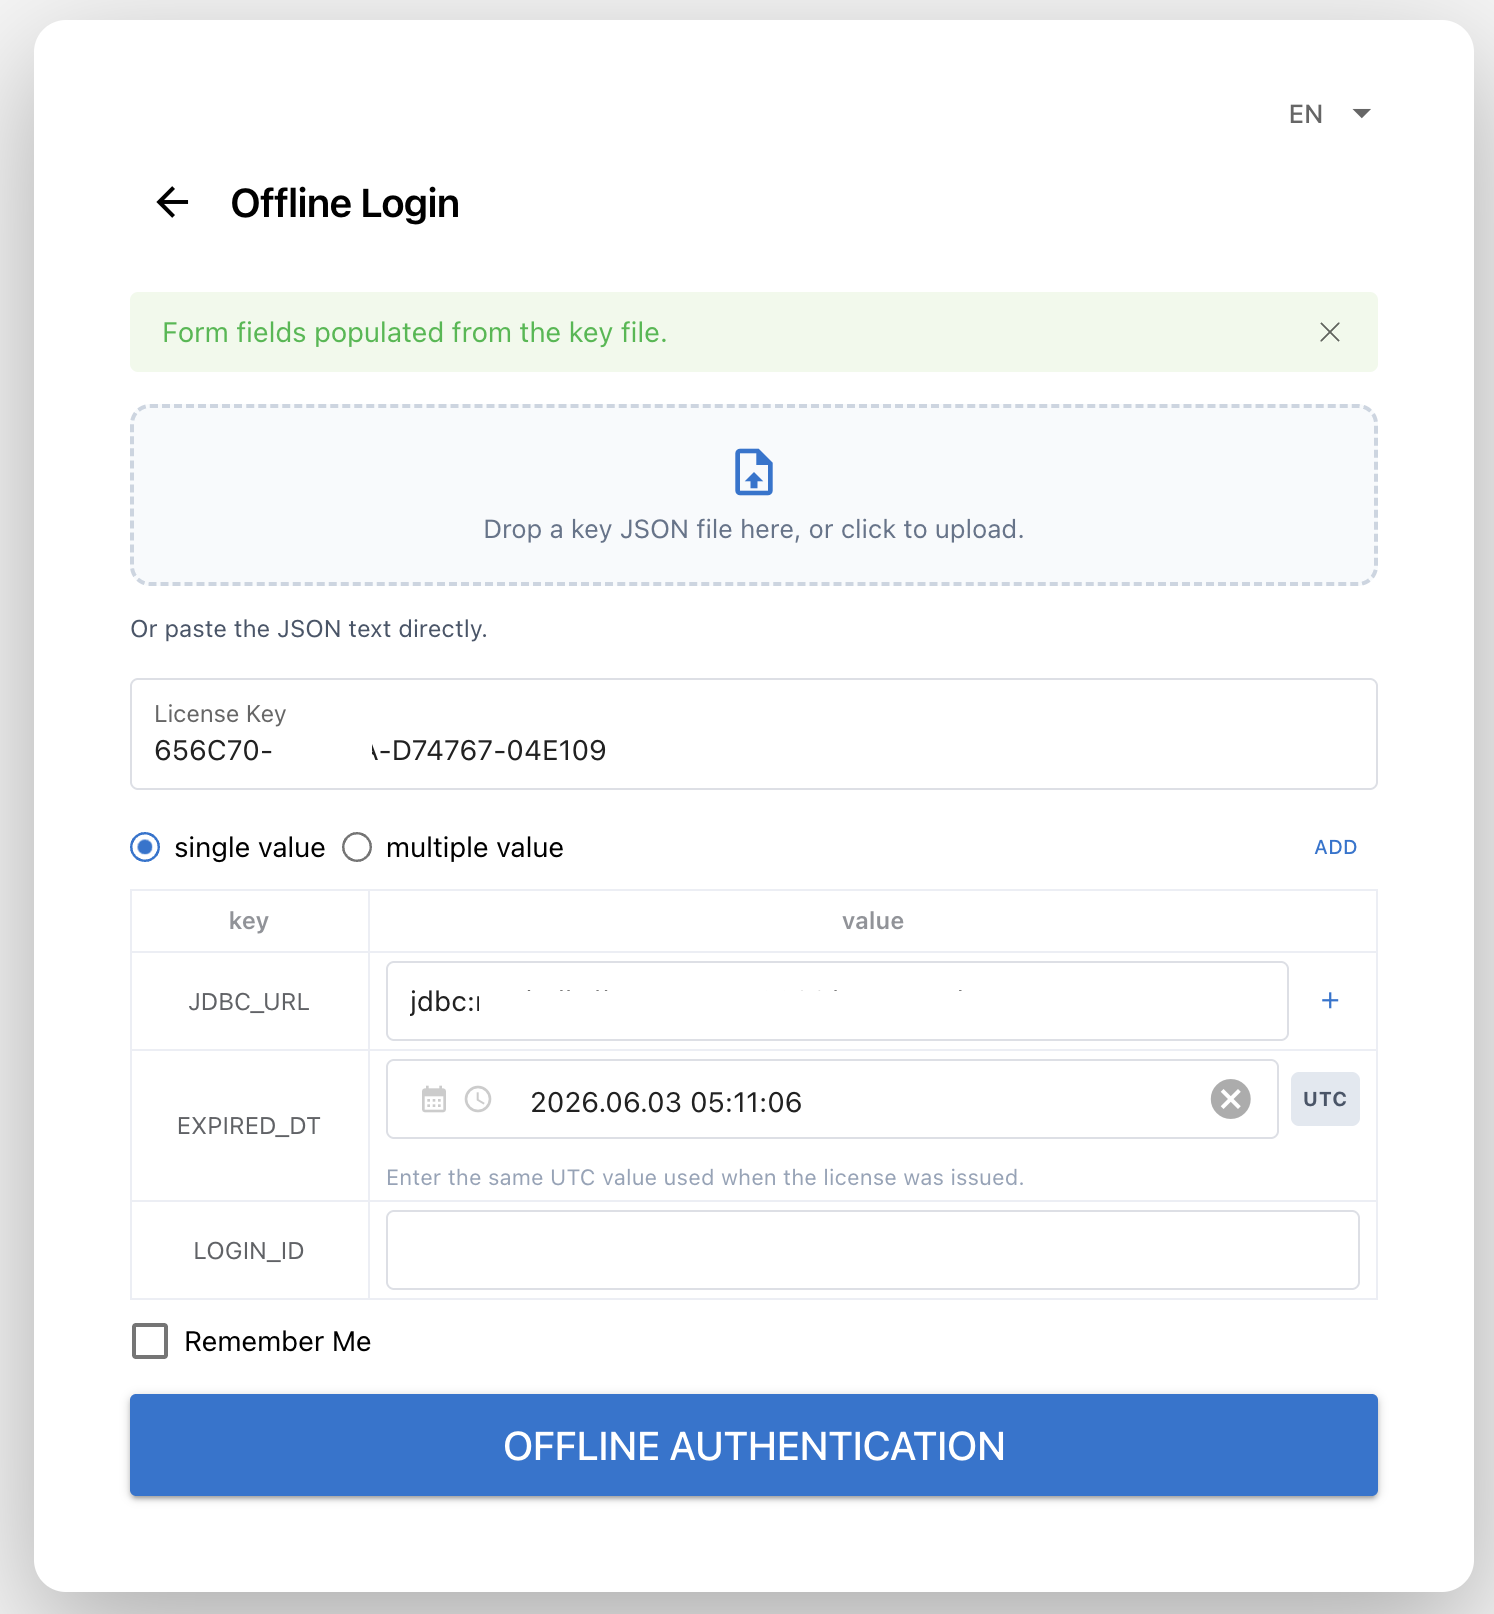
Enter License Key
Enter your issued license key. If you have a JSON key file from My Page self-issuance, you can drag & drop or upload the file to auto-fill the form.
Configure License Parameters
Click the "Add" button to auto-generate default parameters. Enter values according to your license.
| Parameter | Description | Example |
|---|---|---|
JDBC_URL | JDBC connection URLs allowed in offline mode (multiple entries allowed) | jdbc:mariadb://db.example.com:3306/mydb |
EXPIRED_DT | License expiration date | 2026-12-31 23:59:59 |
LOGIN_ID | Offline user identification ID | user@company.com |
Check "Remember" to save the license key and parameters locally for auto-fill on next launch.
Authentication Complete
Click "Authenticate". Once the license is validated, you'll navigate to the project selection screen.
Note: When the license expires, the session ends automatically. Re-authenticate with a renewed license key.
Offline Project Management
In offline mode, projects are managed on the local file system.
Create New Project
Click Create Button
Click the "New Database Project" button on the project management screen.
Select Directory
Click the "Search..." button in the Location field to select a project directory.
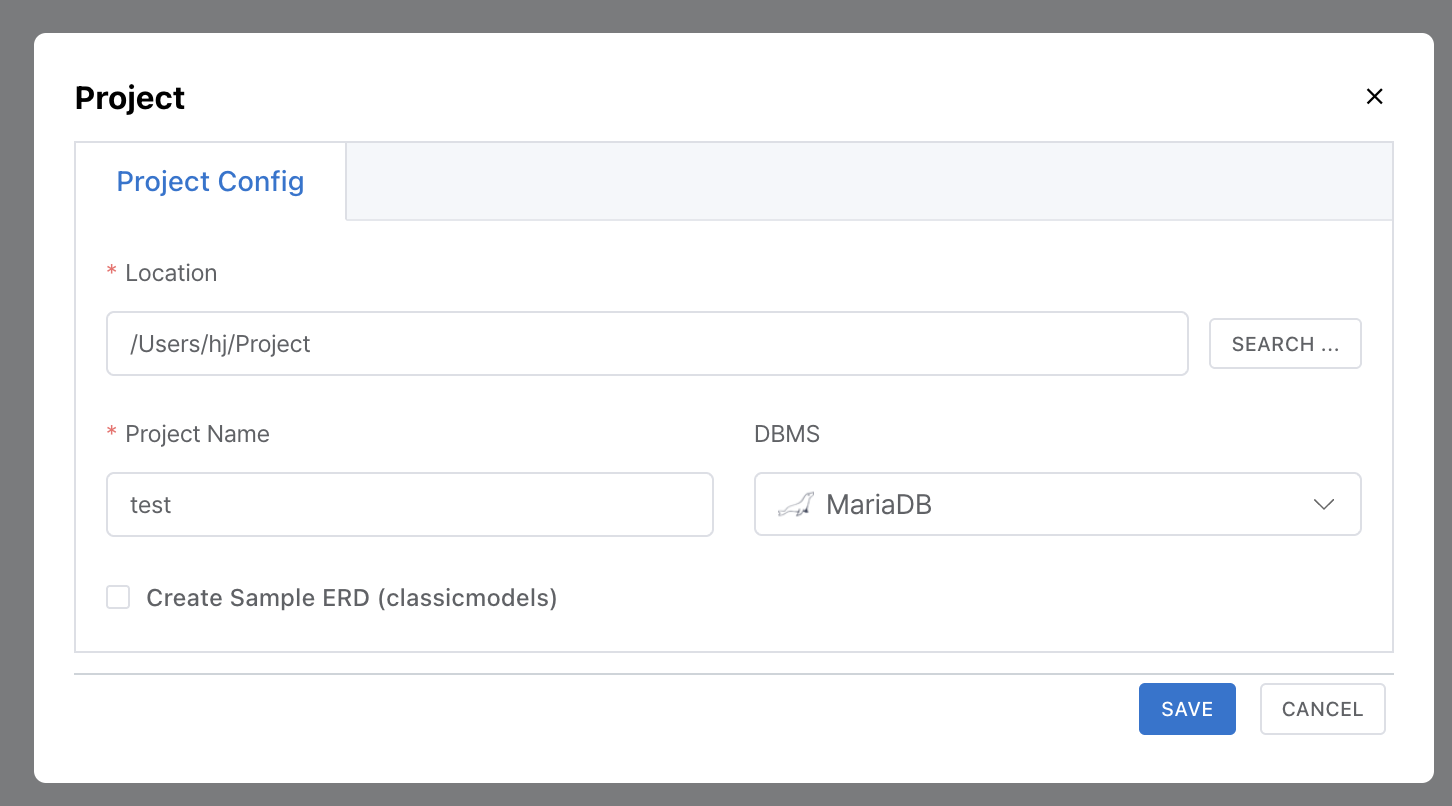
Configure & Save
Set the project name and DBMS, then click "Save". A .neosql/ folder will be auto-created in the selected directory.
Import Existing Project
Click Import Button
Click the "Import Project" button on the project management screen. (Only shown in offline mode)
Select Project Directory
Select a directory containing an existing .neosql/ folder. If project-config.json is detected, the project settings will be loaded automatically.
Commit the .neosql/ directory to Git to share project settings (ERD, table definitions, connection info) across team members. Each member can clone the repository and use "Import Project" to work in the same environment.
Data Storage
Online Mode
Project data is automatically synchronized to the cloud. Sync starts automatically when a project is opened — no manual save needed.
Note: Even if the network is temporarily disconnected, work continues with local data. Sync resumes automatically when the network is restored.
Offline Mode
All data is stored as JSON files in the .neosql/ folder within the project directory.
{project-root}/.neosql/
├── project-config.json                        # Project settings (name, DBMS, template pack, etc.)
├── connections/                               # DB connection info
│   └── {connectionId}_{connectionName}/       # Per-connection directory
│       ├── connection.json                    # Connection settings (host, port, driver, etc.)
│       └── {schemaName}/                      # Per-schema directory
│           ├── {tableName}.json               # Table definition (columns, indexes, FKs, etc.)
│           └── {tableName}_entity.json        # Java Entity mapping info
├── erd/                                       # ERD diagrams
│   └── {erdId}.json                           # ERD definition (nodes, edges, layout, etc.)
└── sql/                                       # SQL Editor saves
    └── {sqlId}.json                           # SQL script (query body, metadata)
Sensitive credentials (DB passwords, SSH keys, etc.) are not stored in .neosql/ but encrypted in the OS secure storage. This means committing .neosql/ to Git is safe — passwords are not included, and credentials are stored individually on each team member's PC.
Data Portability
The execution mode is decided when a project is created and cannot be switched afterward. However, the offline mode's .neosql/ folder is a fully portable bundle — share it with another machine or teammate and the same project can be reconstructed.
Why modes can't be converted
Offline mode uses the local file system (.neosql/ folder) while online mode uses PouchDB ↔ CouchDB sync, so the storage backends are fundamentally different. An offline project cannot be uploaded to the cloud, and an online project cannot be downloaded for use in an air-gapped network. If you need to switch environments, create a new project in the target mode and migrate ERD/SQL definitions separately.
Sharing an offline project with a team
The offline .neosql/ folder is plain-text JSON, and sensitive credentials (DB passwords, SSH keys, etc.) are not stored there — they live in the OS secure storage. That means committing .neosql/ to a Git repository lets the team share ERDs, table definitions, and SQL scripts without leaking secrets.
- The project owner commits and pushes the .neosql/ folder inside the project directory to Git.
- Teammates clone the same repository.
- Each teammate uses "Import Project" in NeoSQL Desktop to pick the directory containing .neosql/ — the same ERD and SQL workspace appears.
- Each teammate enters the DB password into their own OS keychain — credentials never leave the local machine, so the shared repo stays safe.