Creating Template Packs
Want generated code that matches your team's or project's conventions? Build your own template pack. This guide walks through the author's flow: creating a pack, writing templates, and publishing and sharing it.
Creating a Pack
Open the Template Pack page from the left menu.
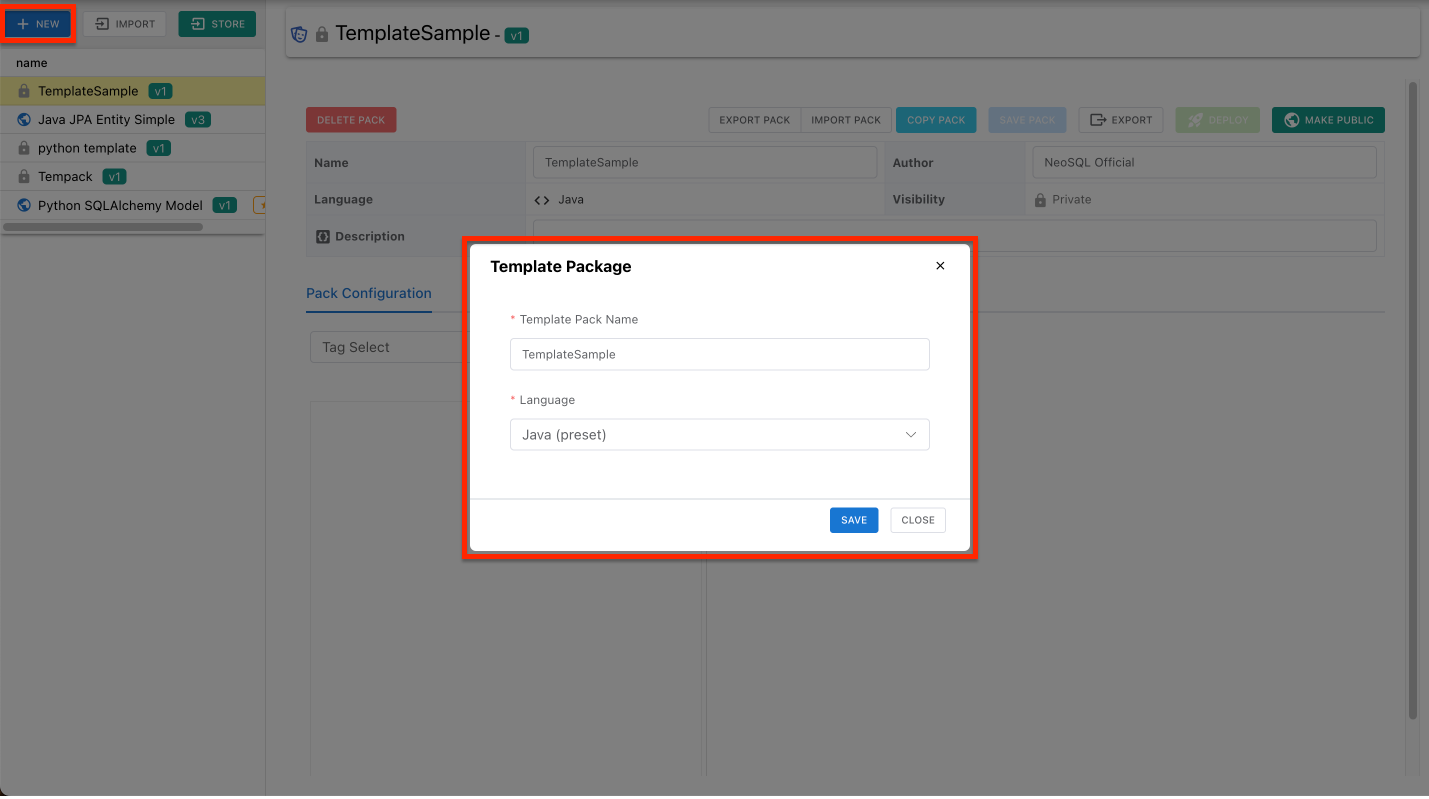
Click [New]
The [New] button above the pack list on the left opens the creation modal.
Pick a name and language
Choosing Java or TypeScript pre-fills the type mappings and variable definitions with proven presets. For other languages, choose "Custom…" and type the language name (go, python, ...).
Save
Click the Save button at the bottom to create the template pack.
Already have a pack as a folder or ZIP? Use [Import...] to load it. If a pack with the same name exists, you choose whether to merge into it or add it as a new pack.
Writing Templates
Fill in the basics
Enter the template pack's name, author, and description in the top card.
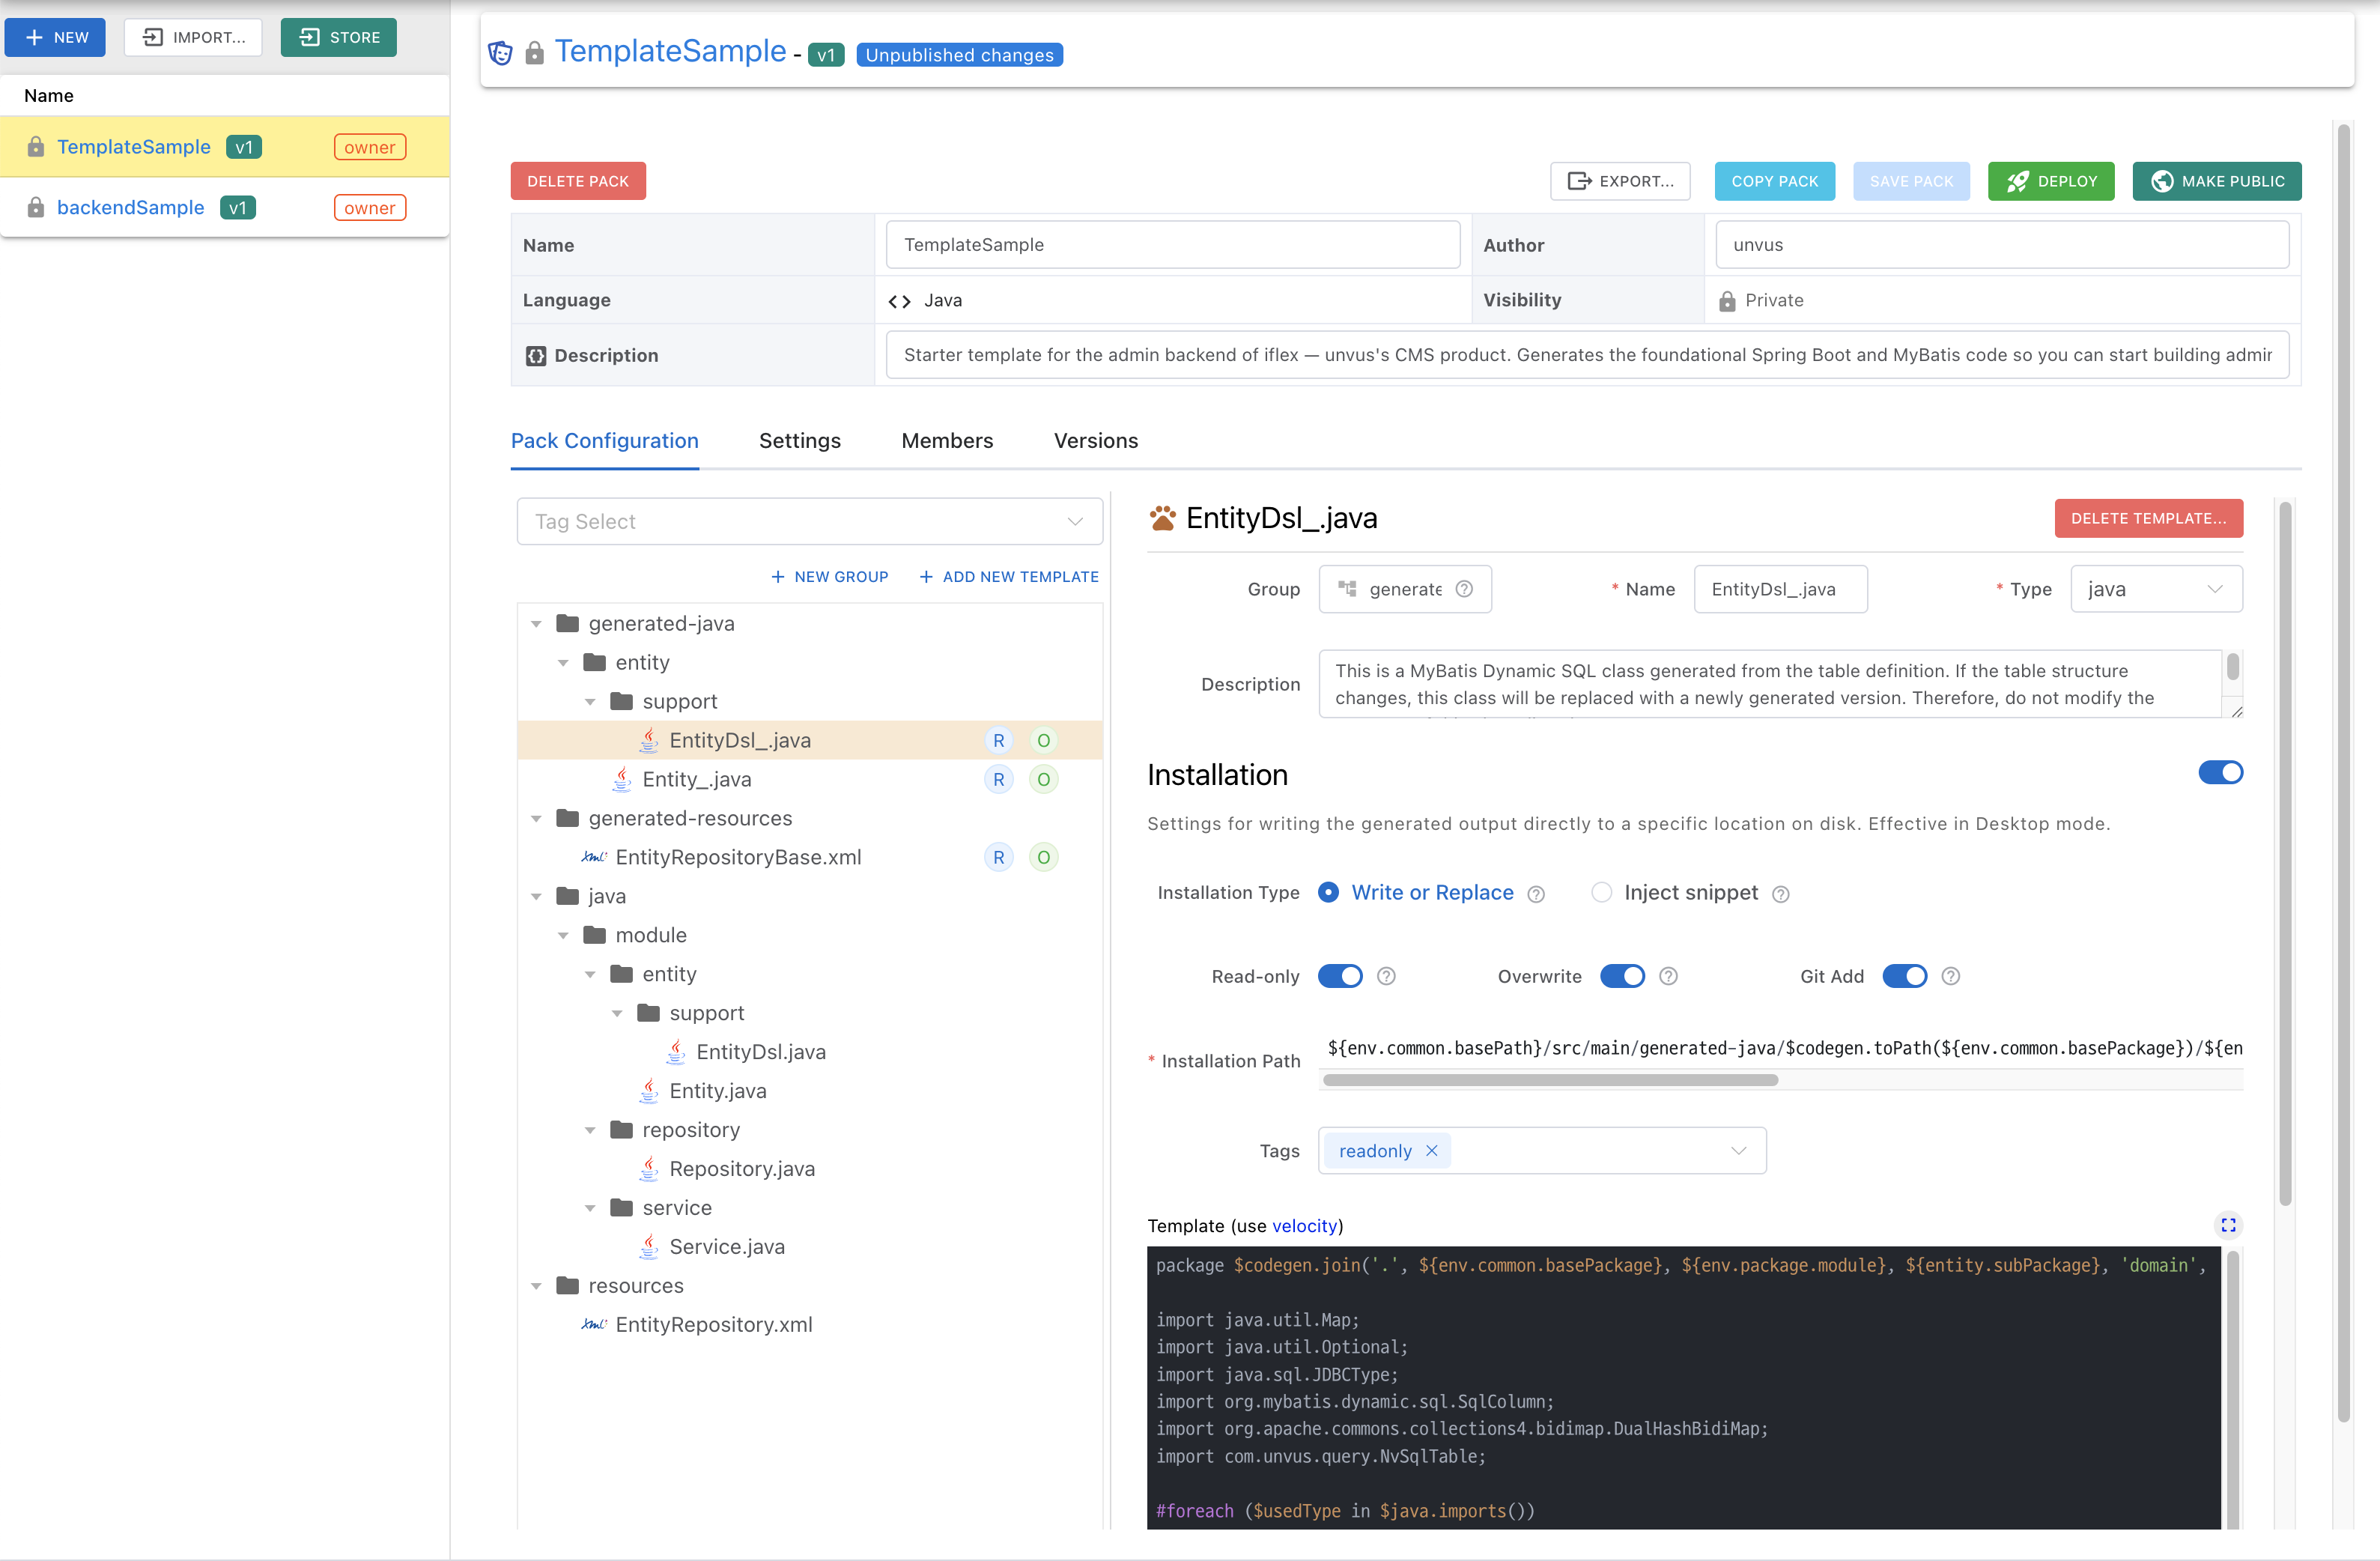
Pack Configuration
The "Pack Configuration" tab is your workspace: the group/template tree on the left, and the editor for the selected item on the right.
Group tree
Add groups and templates with the [Add root group] and [New template] buttons or the right-click menu. Move the items you create anywhere, or organize them into groups, with drag & drop.
Template properties & body
Set the name, type, description, and tags, then write the Velocity body. The body editor supports find & replace. When you add tags to a template, people using the pack can quickly find and filter templates by tag on the code generation screen.
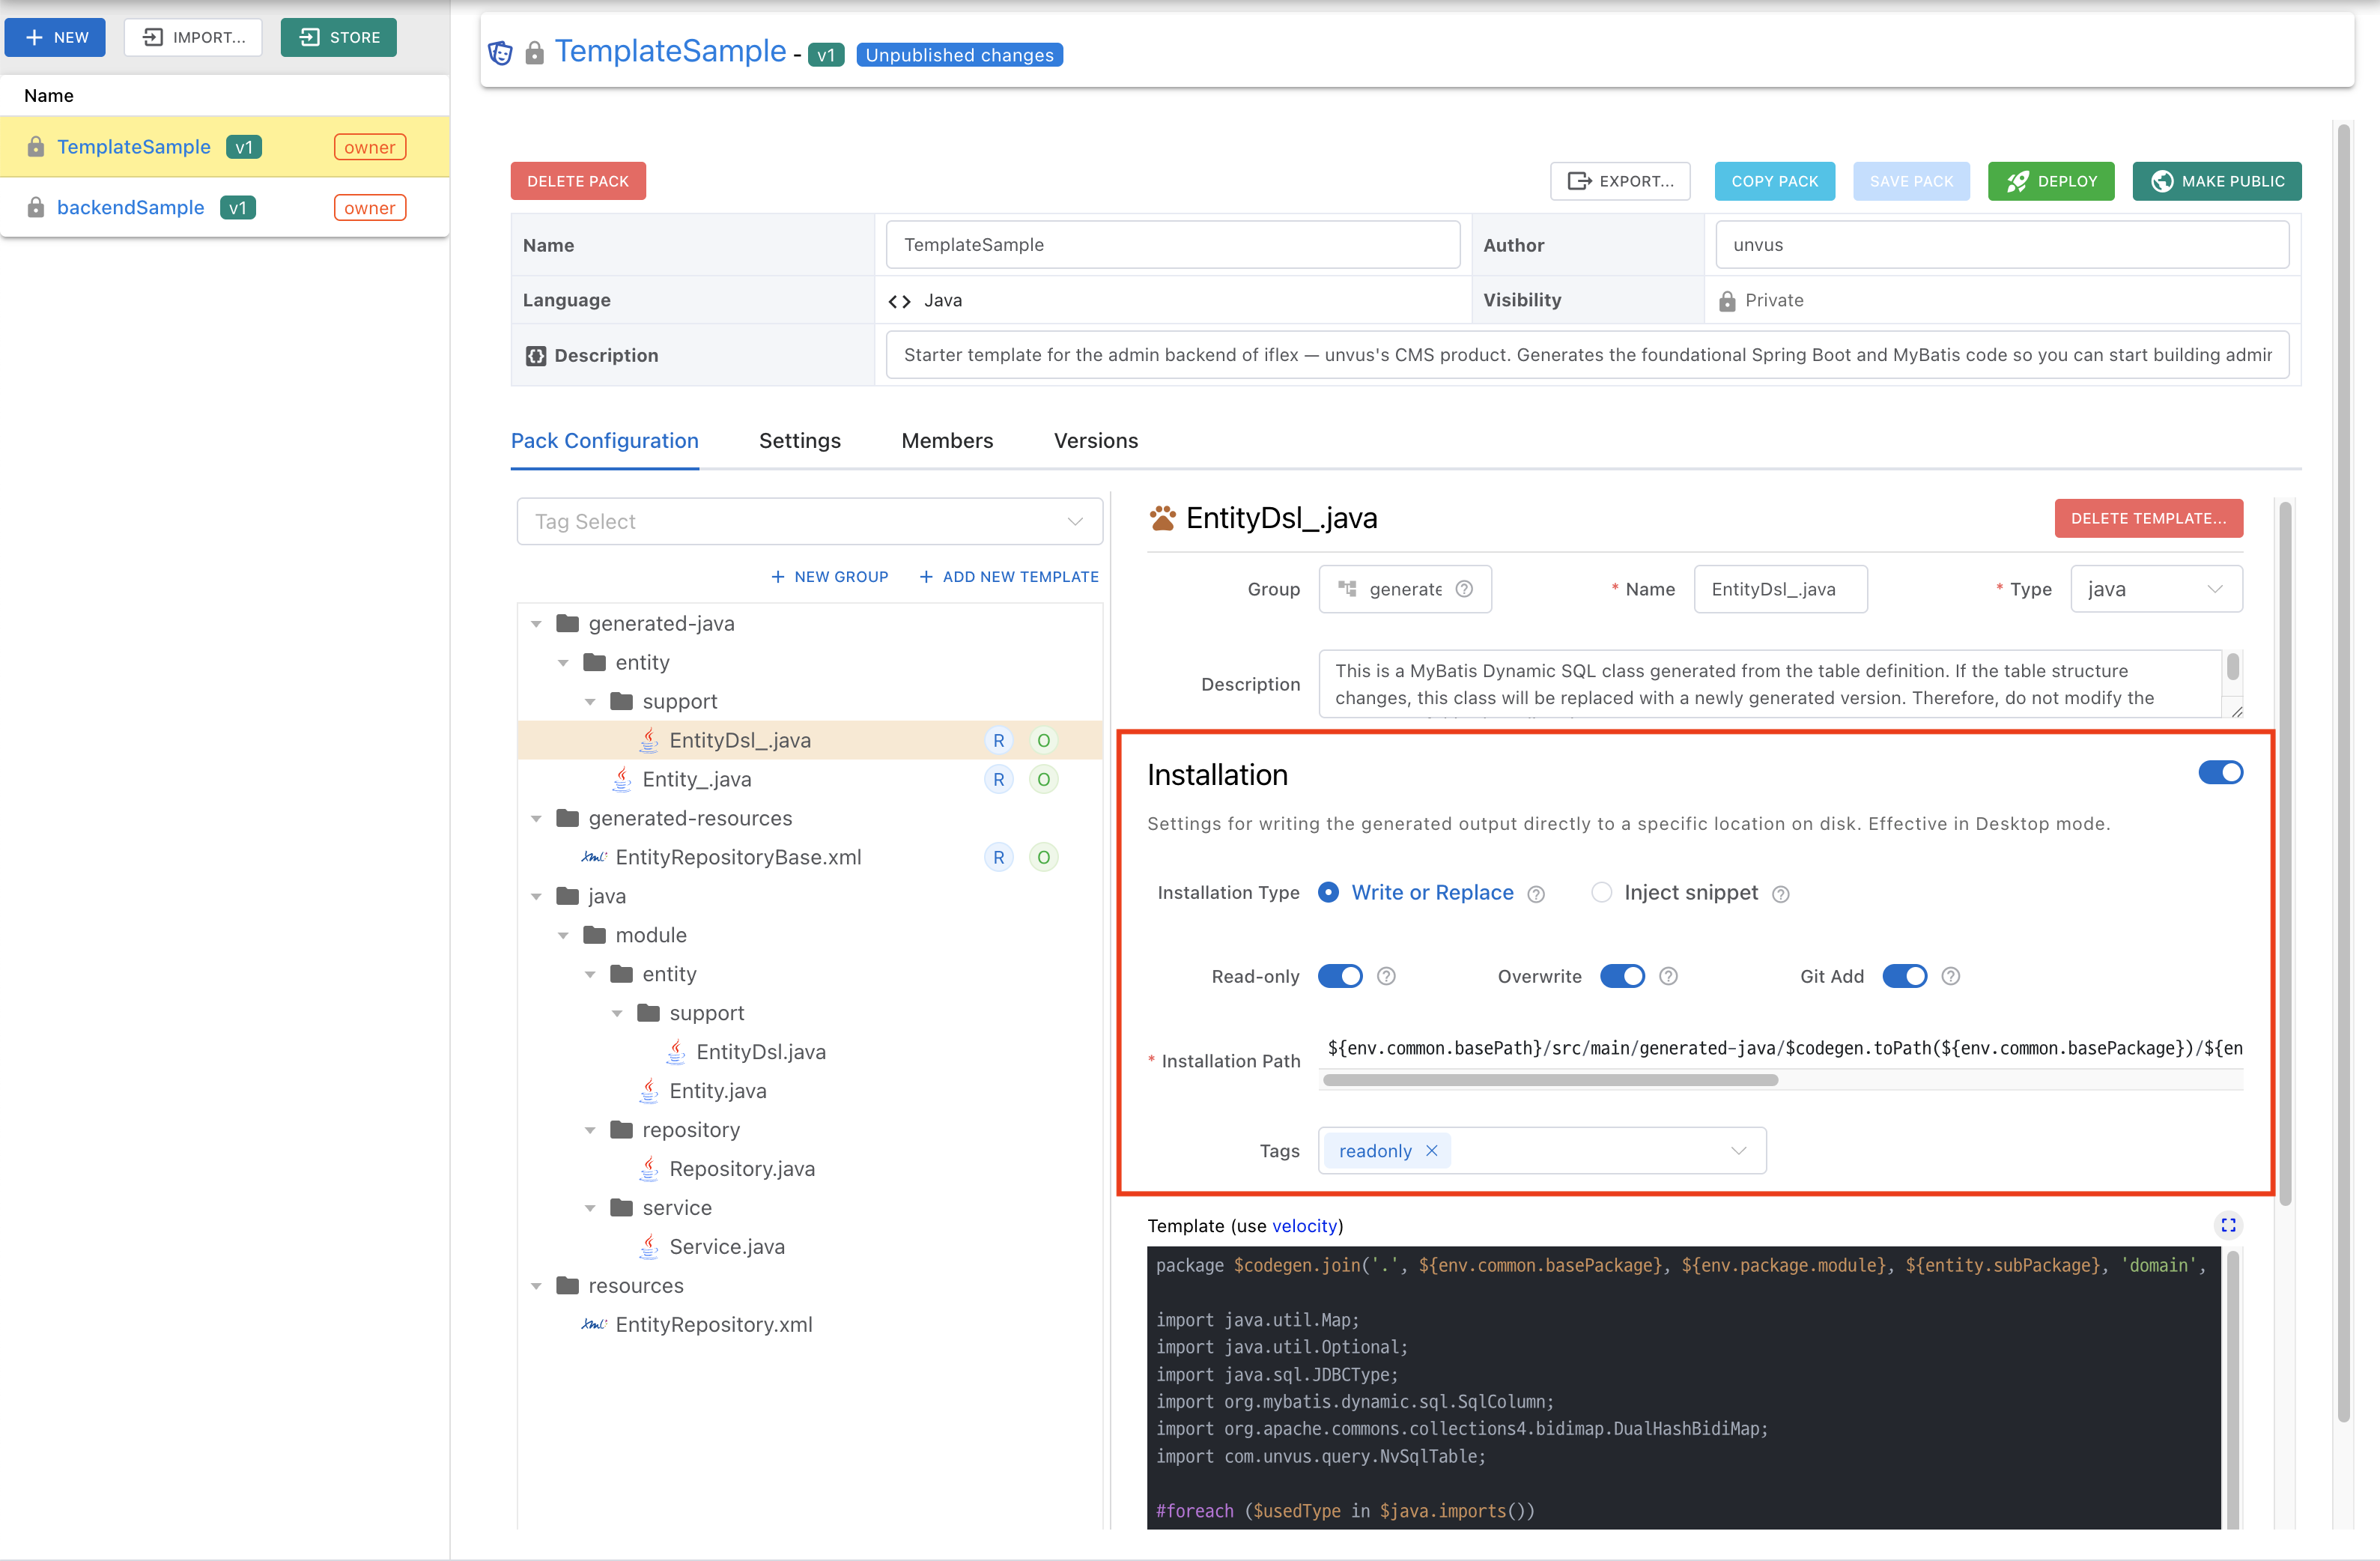
Installation rules
Define which path the generated source code is saved to, and how.
| Option | Meaning |
|---|---|
| Install type | "Write/replace file" creates a new file at the target path; "Inject snippet" inserts a code fragment at a placeholder inside an existing file. |
| Install path · filename | Variables are allowed — combine module path, package, and entity name to build the file location. |
| Overwrite | Replaces an existing file. Turn it off to write to the "alternative path" and preserve the original. |
| Read only | Makes the generated file read-only at the OS level — protects regeneration-managed files from manual edits. |
| Git Add | Runs git add right after the file is created. |
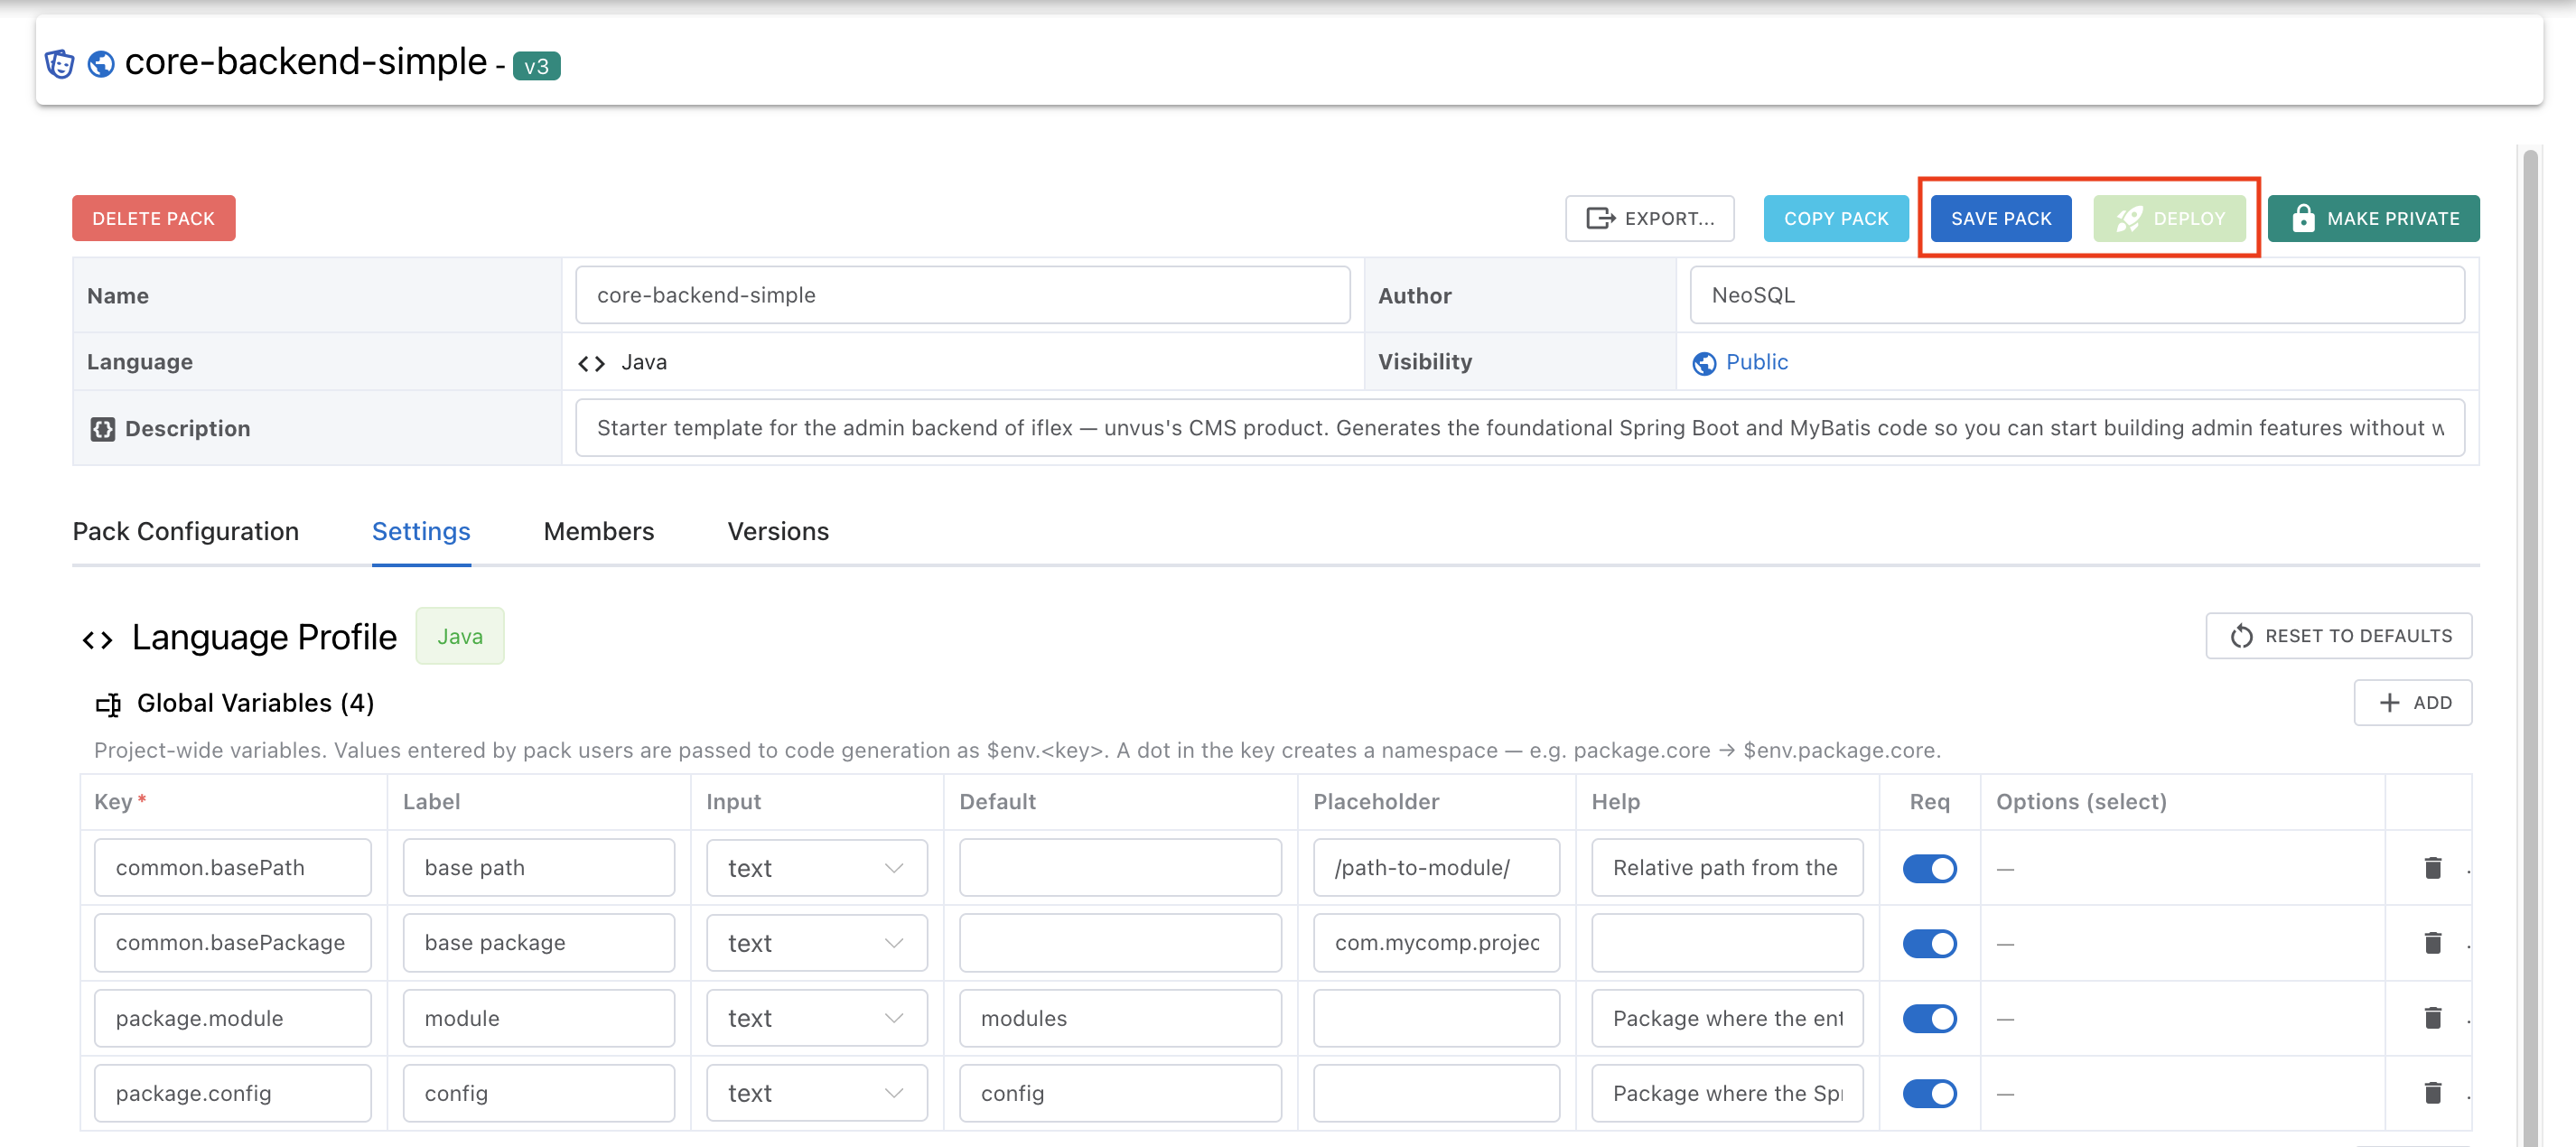
Language Profile (Settings tab)
Declaring variables — global / entity / field
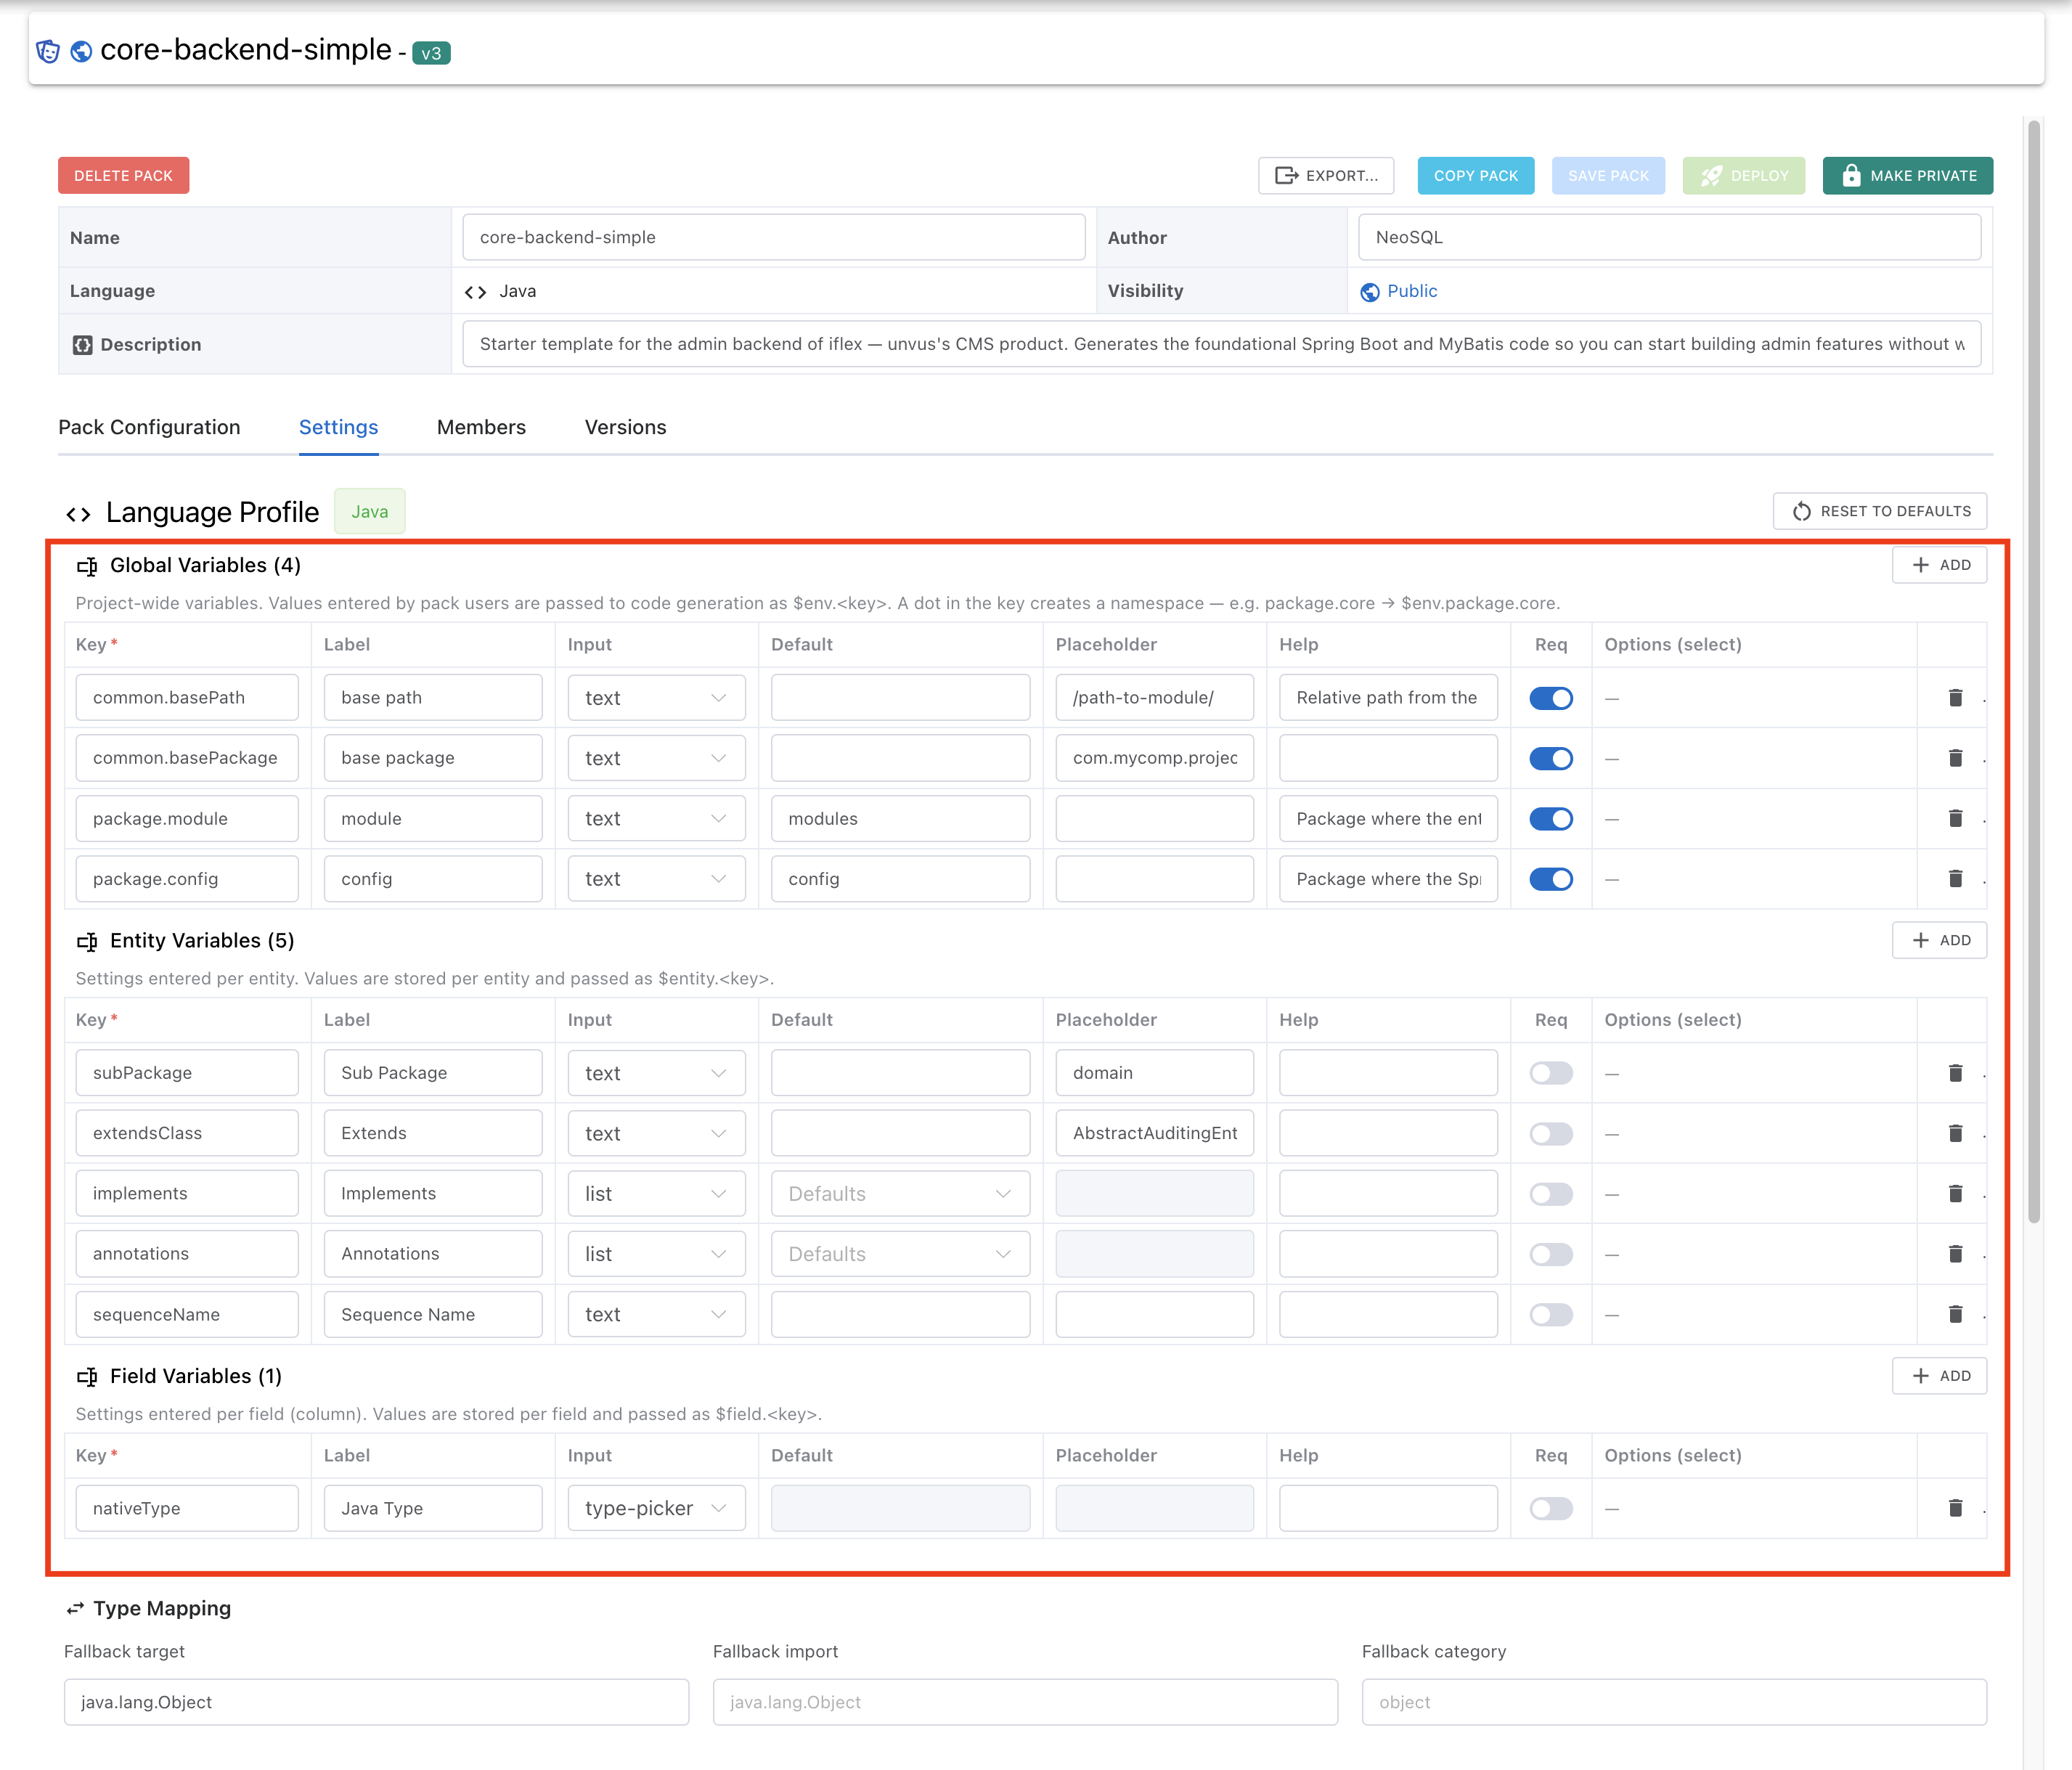
When you declare a variable here, an input form for it is created automatically on the screen of whoever uses the pack. For each variable you set its key (the name used in templates), the label shown on screen, the input type, a default, whether it is required, and — for a select — its options. Variables come in three kinds by scope:
| Kind | Where users enter it | Access in templates |
|---|---|---|
| Global variables | Project Configuration → Templates Variables on the Code Generator tab | $env.<key> |
| Entity variables | Table detail → Code Generator tab → Per-pack Settings → Entity | $entity.<key> |
| Field variables | Table detail → Code Generator tab → Per-pack Settings → Fields | $field.<key> |
A dot in a key creates a namespace — declare package.core and you access it as $env.package.core in templates. If you ever change something by mistake, the "Reset to defaults" button restores the language preset's defaults at any time.
Type mappings
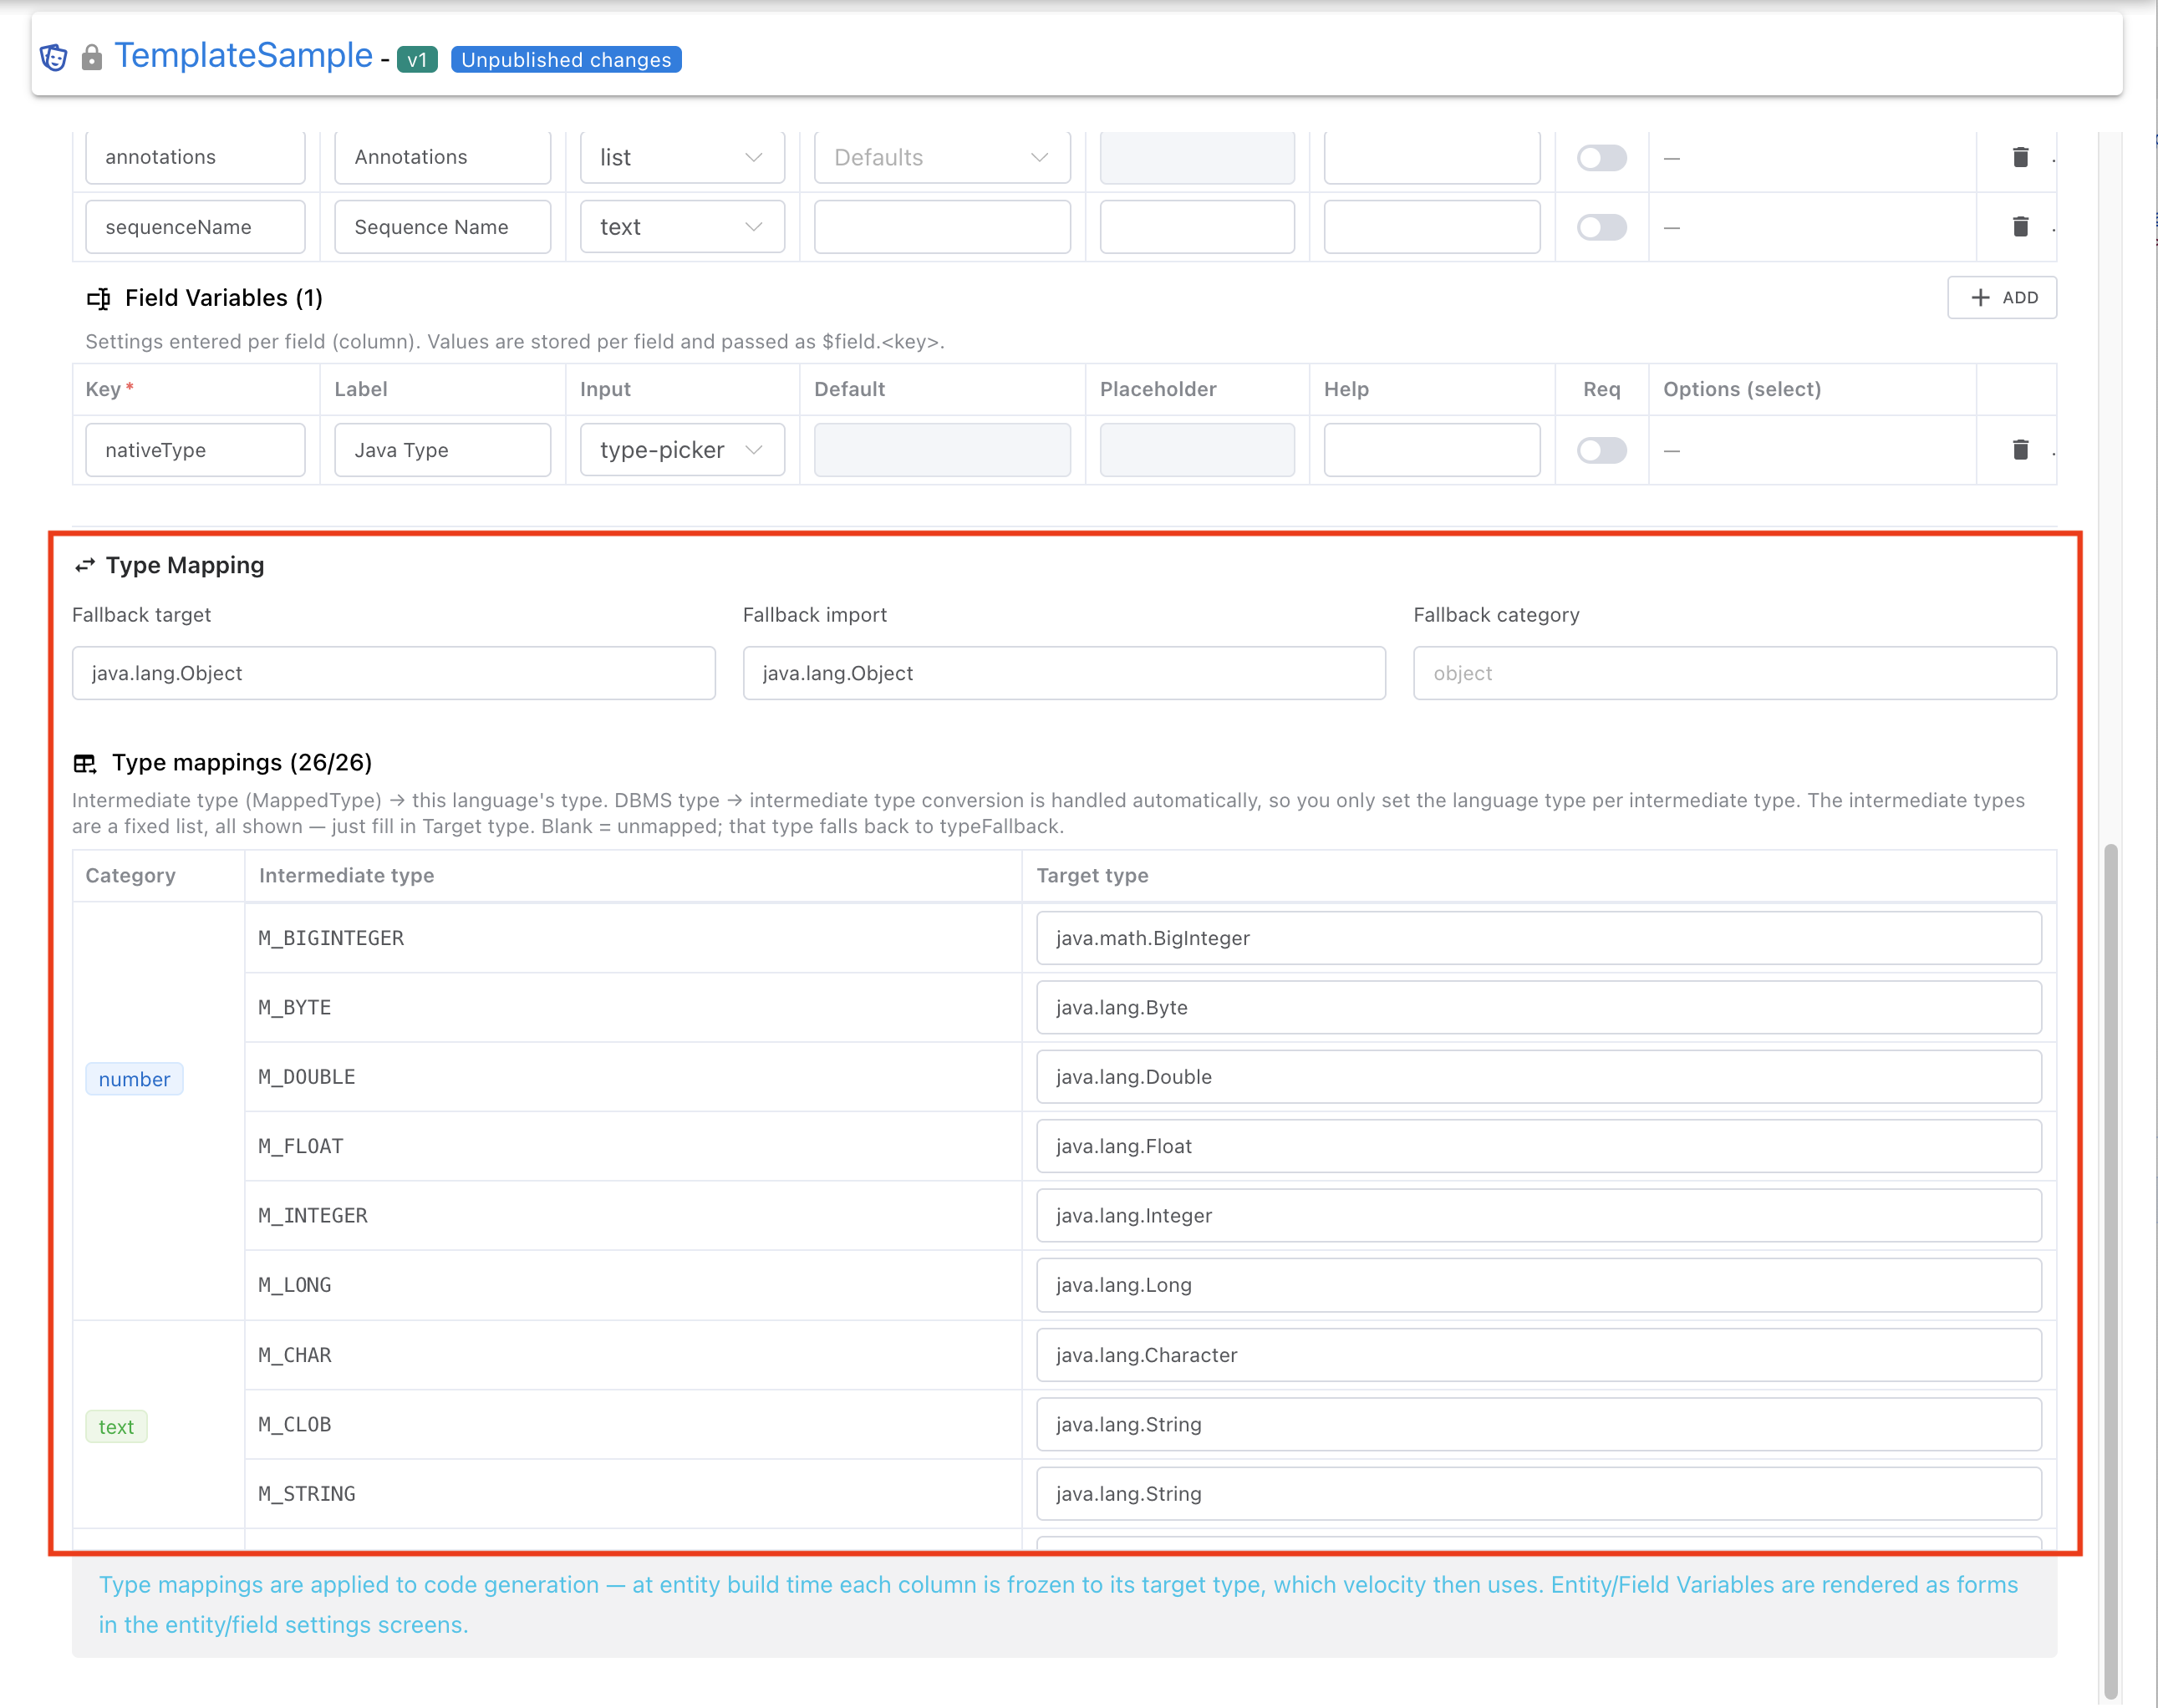
Specify what type each DBMS column type should be converted to in the language this template generates. For example, you can map BIGDECIMAL to Java's java.math.BigDecimal.
Each column of the type mapping table means the following.
| Column | Description |
|---|---|
Category | Groups the types by nature such as number, text, and datetime. |
Intermediate type | NeoSQL's internal standard type that unifies column types from various databases. |
Target type | The column where you write what type the Intermediate type becomes in the language set for this template; what you enter goes straight into the generated code. (e.g. an integer type → Long for Java, number for TypeScript). Leave it blank to use Fallback target. |
Types without a mapping use the fallback setting.
| Field | What it sets |
|---|---|
Fallback target | The default target type used for an unmapped type — e.g. java.lang.Object for Java, any for TypeScript. This flows into the generated code. |
Fallback import | The default import path that fallback type needs — e.g. java.lang.Object. |
Fallback category | The fallback type's category. You usually just set Fallback target and leave this as-is. |
Saving & Publishing
A template pack saved with the [Save Pack] button is visible only to you, the author, and is not shown to other users.
To share the pack with other users, publish it with [Deploy].
Even when you modify a pack, Save alone applies the changes only for the author.
To reflect your changes to other users of the pack, click Deploy to publish a new version or redeploy the current version.
Click [Deploy]
The deploy dialog offers "Deploy as new version" or "Overwrite current version".
Deploy as new version
Creates an immutable snapshot with a bumped version number. Projects using the pack see an upgrade notice and upgrade whenever they choose.
Overwrite current version
Replaces the latest version in place. Use it for changes that don't deserve a version bump, like fixing a typo.
Versions tab
Browse published versions, [Restore to draft] to continue working from a past version, or [Republish as latest] to roll back.
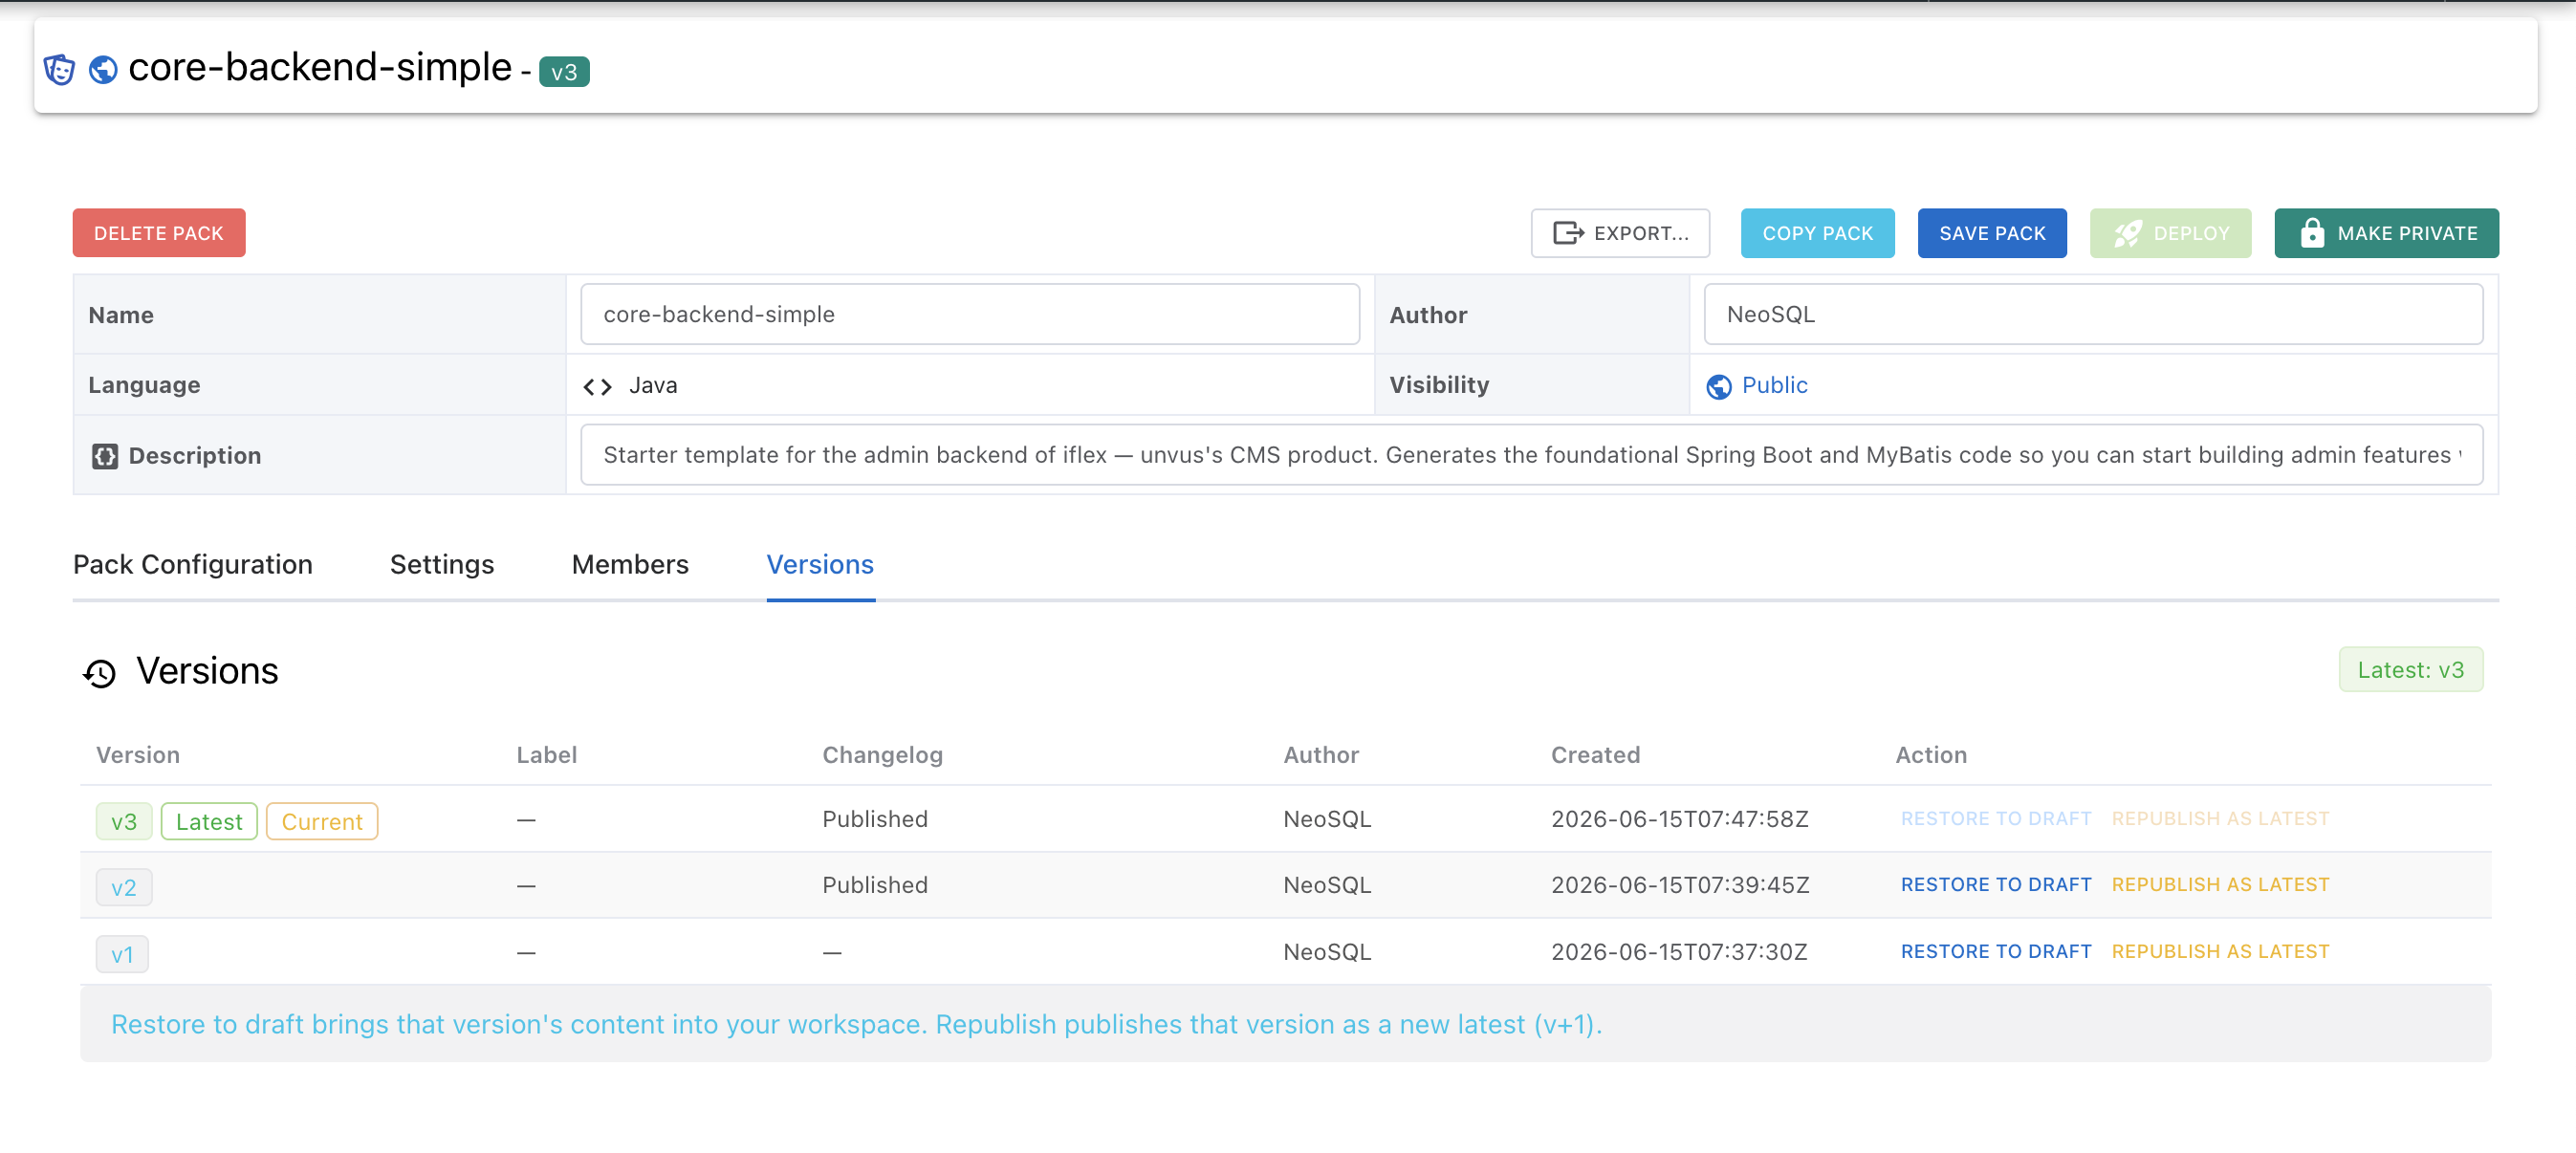
Note: In git terms: the draft is your working copy, and deploying is a push. Published versions are immutable, so you can keep editing the draft without ever breaking consumer projects.
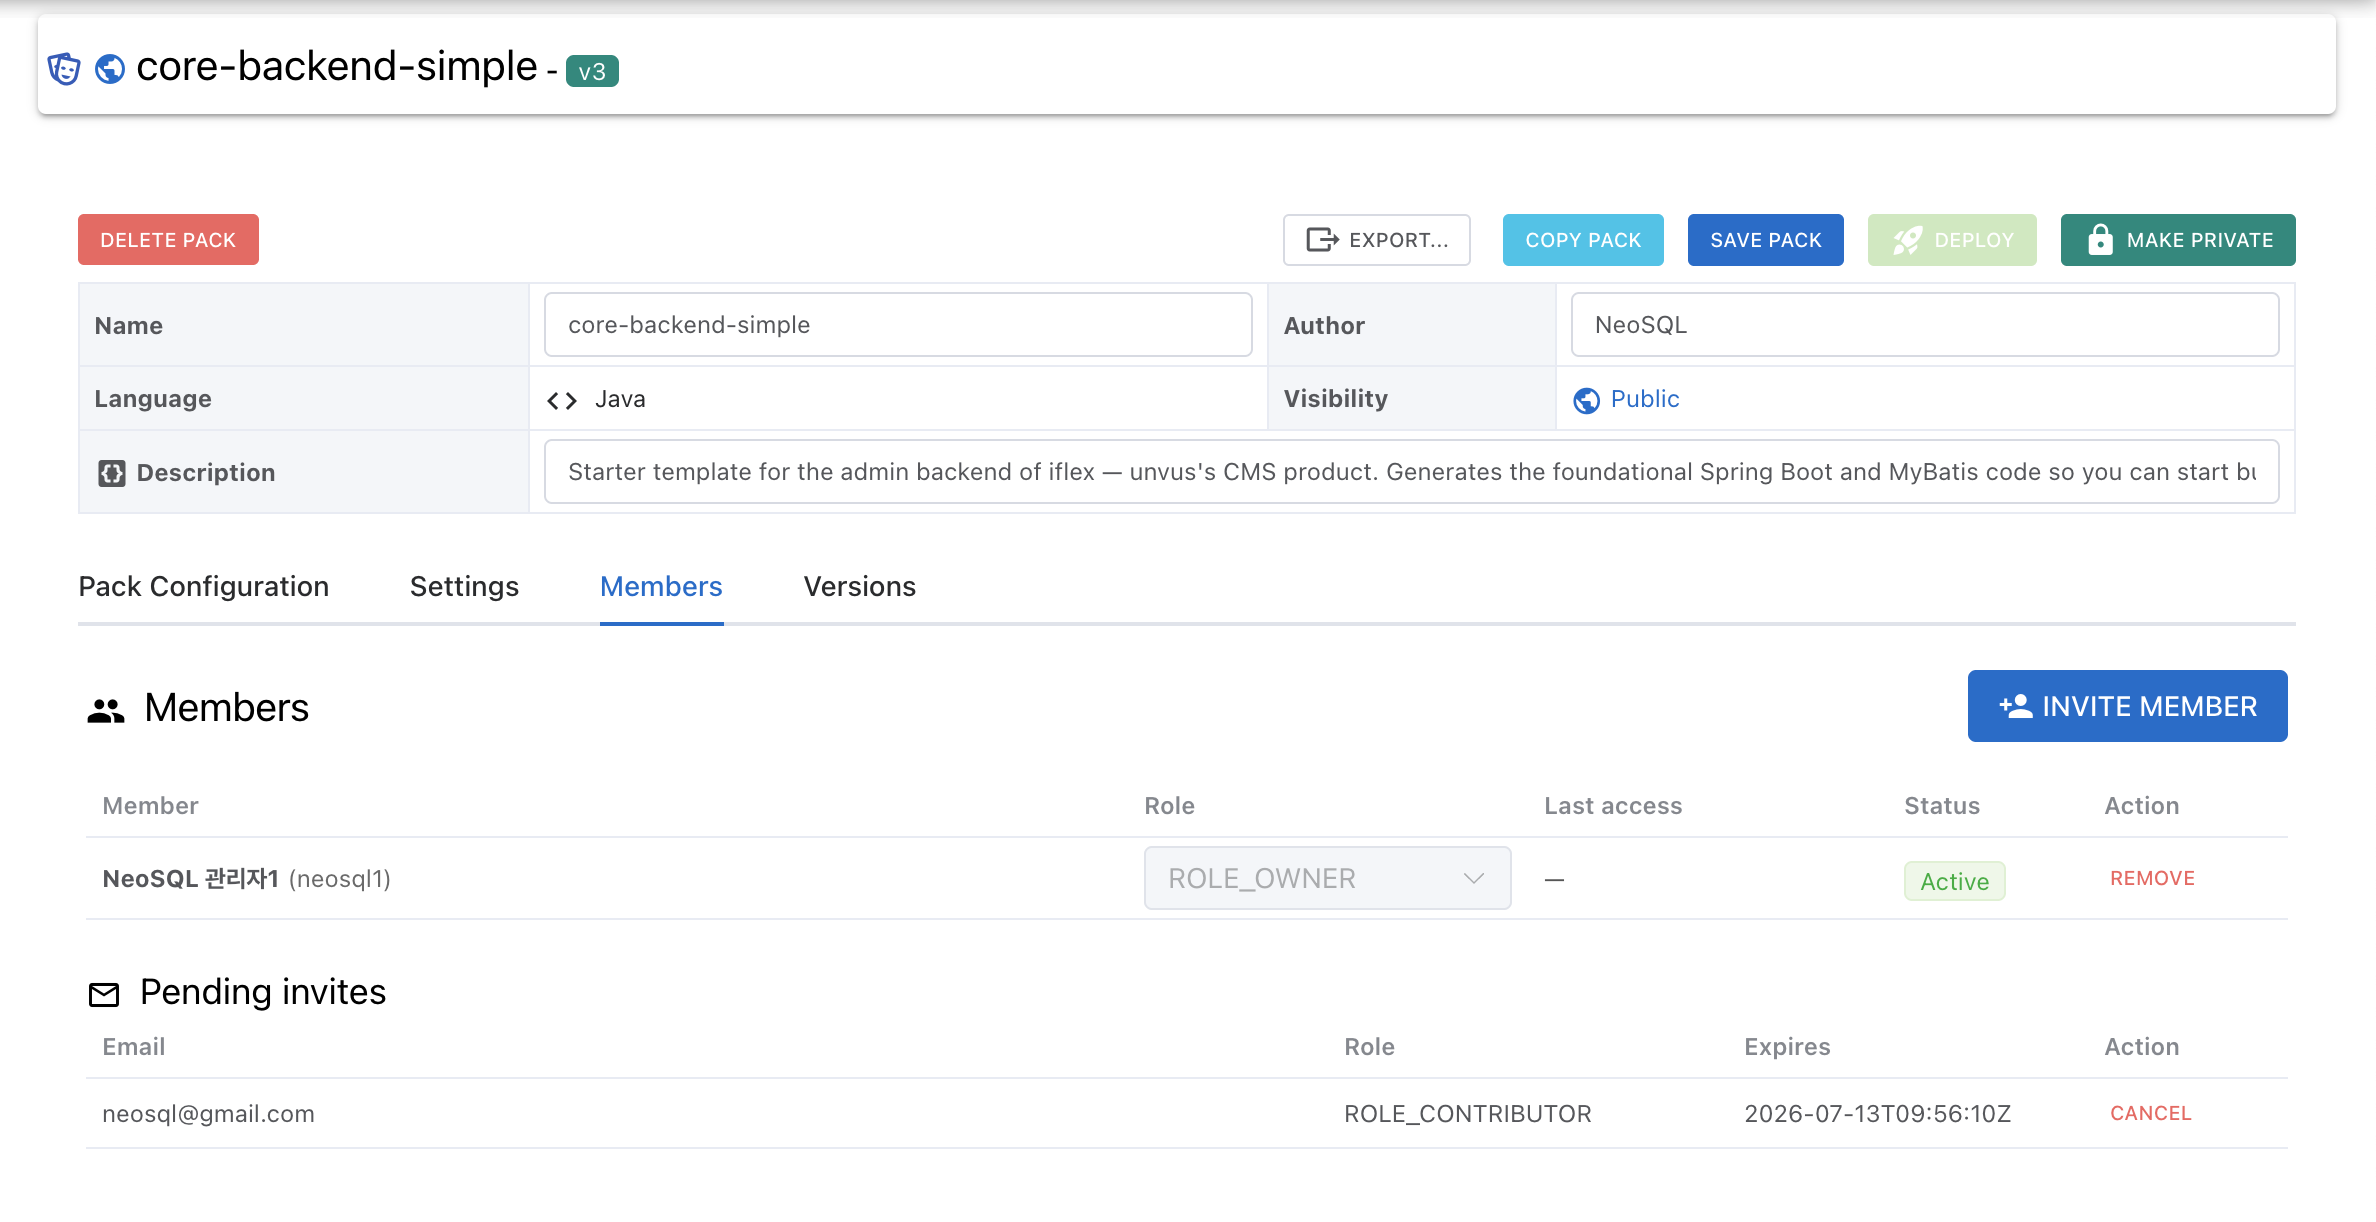
Visibility & Members
Share a finished pack by listing it in the Store, or keep it private and invite specific collaborators as members.
Public / Private
[Make Public] lists the pack in the Store where anyone can Add, Clone, or Favorite it. [Make Private] reverts it to a private pack accessible to members only.
Inviting members
In the Members tab, enter emails (comma-separated), pick a role, and send invites. Pending invites can be cancelled before they are accepted.
| Role | What it allows |
|---|---|
ROLE_OWNER | Everything — manage members and roles, switch visibility, delete the pack |
ROLE_MAINTAINER | Edit templates, deploy, invite CONTRIBUTOR/VIEWER members |
ROLE_CONTRIBUTOR | Edit templates (draft work) |
ROLE_VIEWER | View and use |
Note: Members can leave a pack themselves with the "Leave template pack" button. When the owner runs "Delete pack", every version, member, and each member's editing draft is removed and cannot be recovered.